What's New
Bookmark this page to see all of Brisk's updates in one place. Every week, new features go live and you won't want to miss them!
What's New with Brisk
Never miss a Brisk launch. Whether you're leading PD, sharing Brisk with a teammate, or presenting at a conference, this deck is designed to make it easy to show What's New.
Brisk Math Editor
April 29, 2026
The Math Editor lets teachers and students insert properly formatted equations directly into Brisk. Type the expression once, and it displays the way it would on paper or in a textbook, keeping the focus on the math itself.
How the Math Editor works
The Math Editor is a built-in equation editor accessible via the √x button. It works across every Boost activity type, in both the setup prompt and the student chat, and styled math renders throughout.
Where to find it
Teachers: Open a Boost activity, then click the √x button in the prompt box. The equation editor opens, ready for you to build and insert your expression.
Students: In the Boost chat and in Whiteboard text inputs, click the √x button to insert math notation in your response.
Device support
The Math Editor uses a virtual keyboard for equation input, so it works on Chromebooks, iPads, and other touch devices. On devices with physical keyboards, students can also type equations directly.

The Site Dashboard Got a Major Upgrade
April 27, 2026
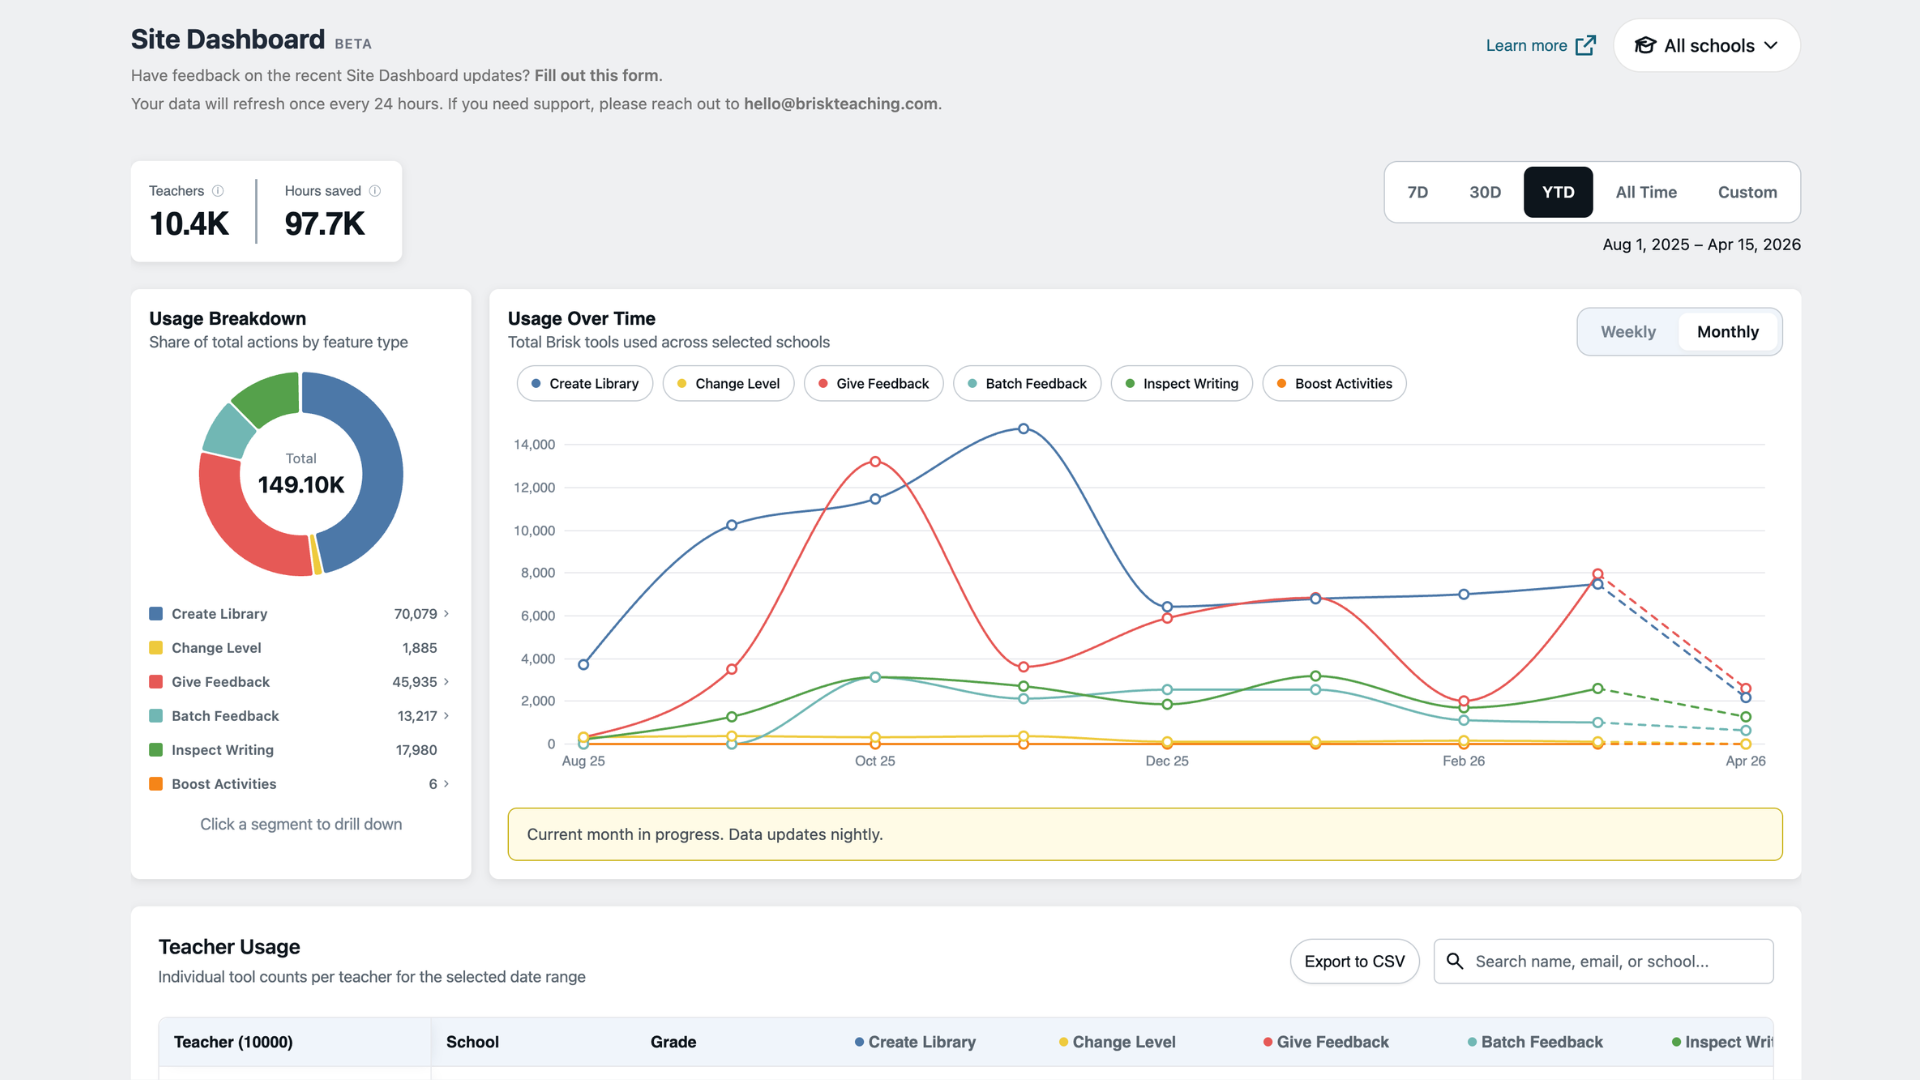
School and district administrators now have a centralized, data-rich view of how teachers across their organization are using Brisk, updated every night.
What you can do in the dashboard
Start at the district level and filter by school or date range to narrow your view. Total teacher count and estimated hours saved appear at a glance, and a feature-by-feature breakdown covers Create, Give Feedback, Batch Feedback, Change Level, Inspect, Boost Activities, and Boost Feedback. Toggle the usage-over-time graph weekly or monthly to see how adoption is trending, then drill into the teacher table to see tool-by-tool usage counts for every teacher on your roster. Search by name, email, or school, and export to CSV to bring the data into a board presentation, department review, or curriculum conversation.
Introducing Instructional Moments
Instructional Moments is a new metric that helps you identify where AI is being used in ways that directly impact students, like feedback, differentiation, and student-facing activities.
A middle school math teacher creates an interactive activity where students practice fraction operations with real-time AI feedback, instead of a static worksheet. That's an Instructional Moment. It doesn't show up in a typical usage report, but it shows up in Brisk's, giving you a clearer signal of where high-impact practices are happening across your schools — not just how often tools are used.
Drill down into tool usage
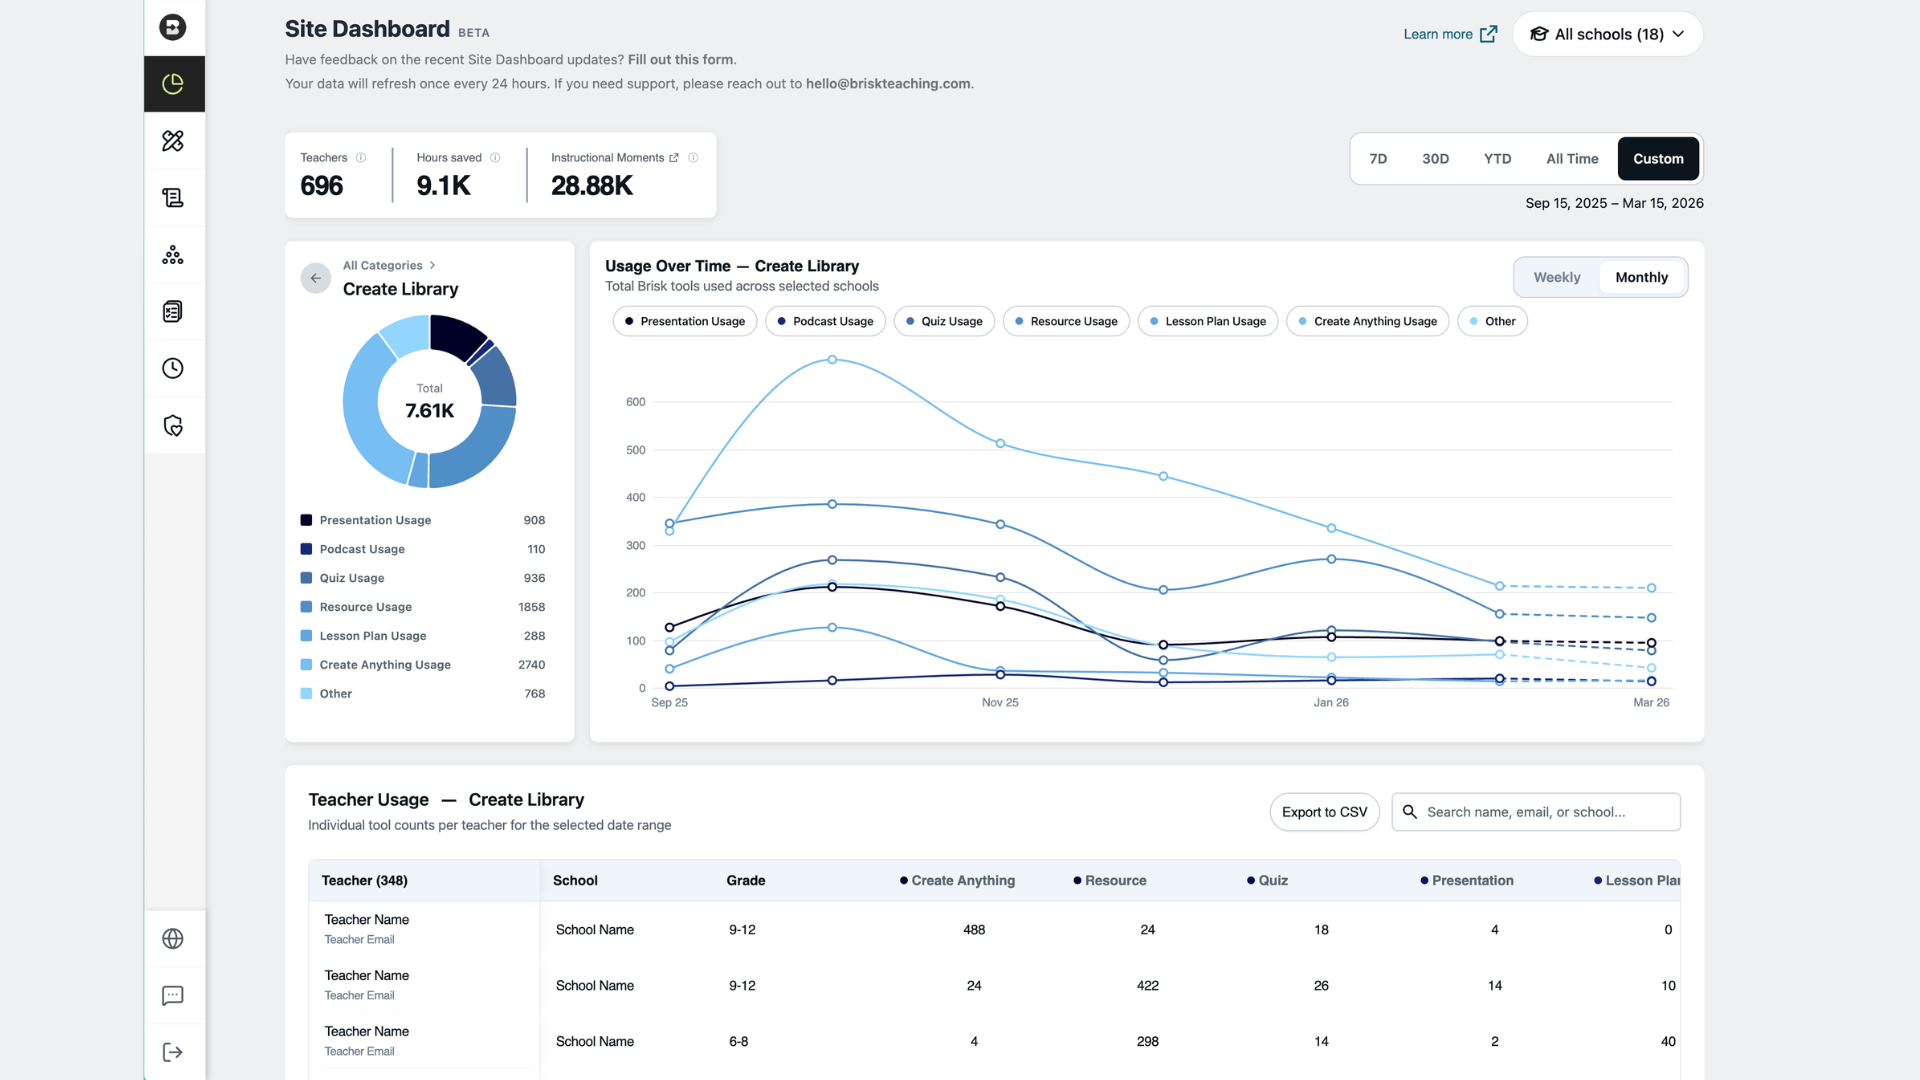
Clicking into any feature takes you deeper. Select Create and the view filters to show exactly how teachers are using it, from presentations and quizzes to podcasts and lesson plans, with Teachers, Hours Saved, and Instructional Moments updating at the top and a filtered teacher table below. The same view is available for every Brisk feature, so whether you want to understand how teachers are using Give Feedback, Inspect, or Boost Activities, the data is one click away.
Available to School & District plan users with rostered teachers.
Learn how to access the Site Dashboard, or watch a walkthrough of the feature.
Generate Quizzes Directly in Nearpod
April 2, 2026
Teachers can now create curriculum-aligned quizzes in Brisk and have them land directly in their Nearpod account — ready to assign.
How it works:
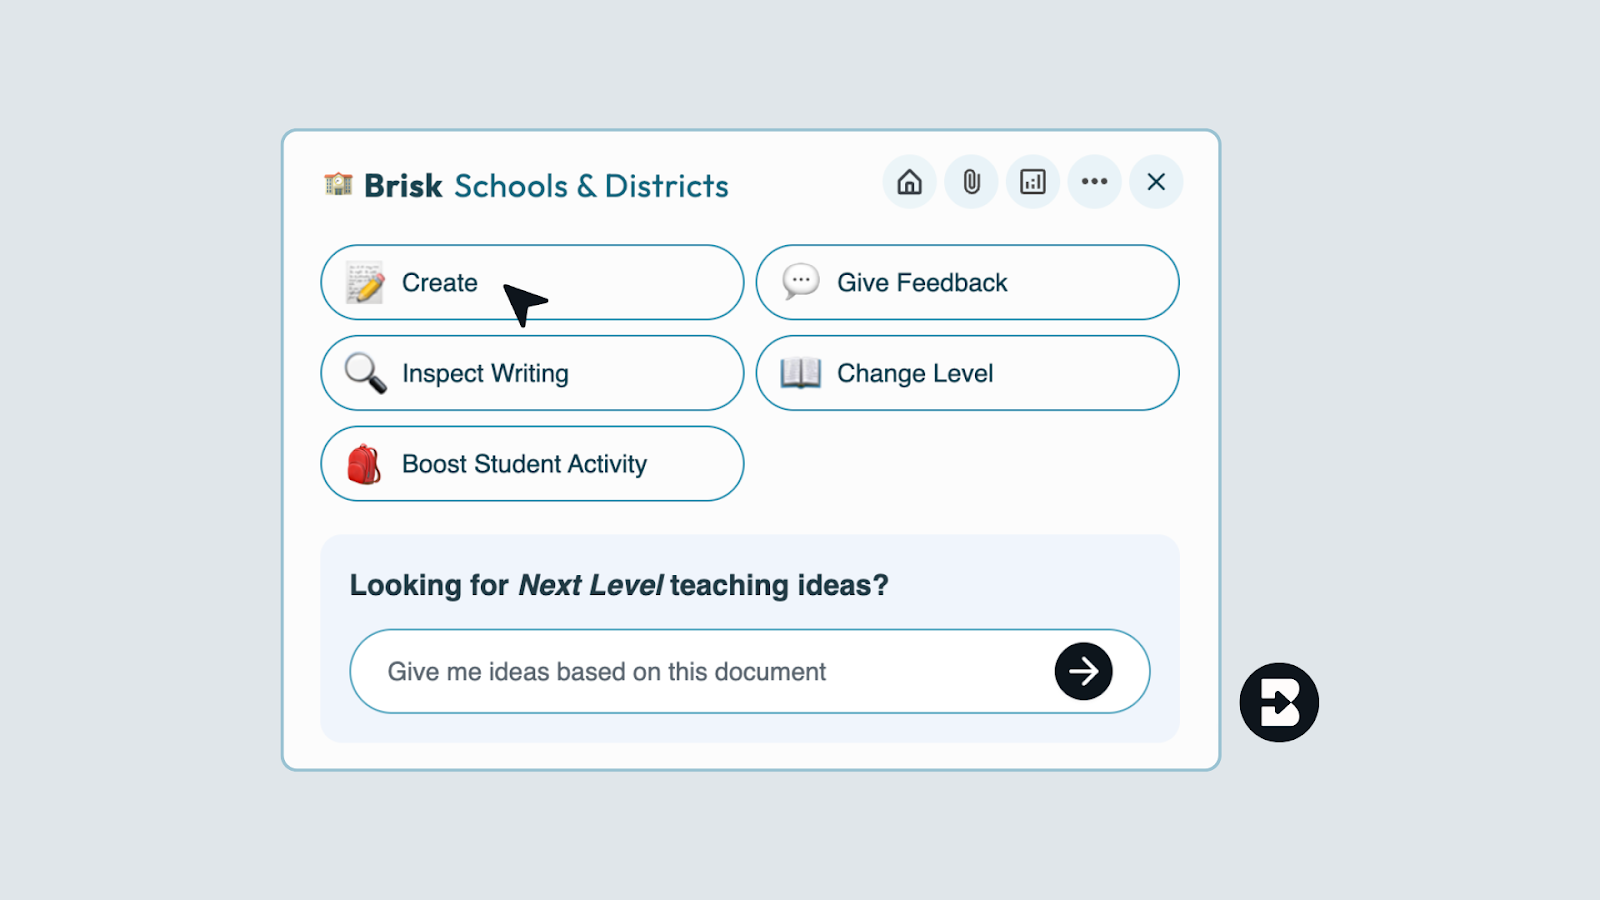
- Open the Create menu in the Brisk Extension.
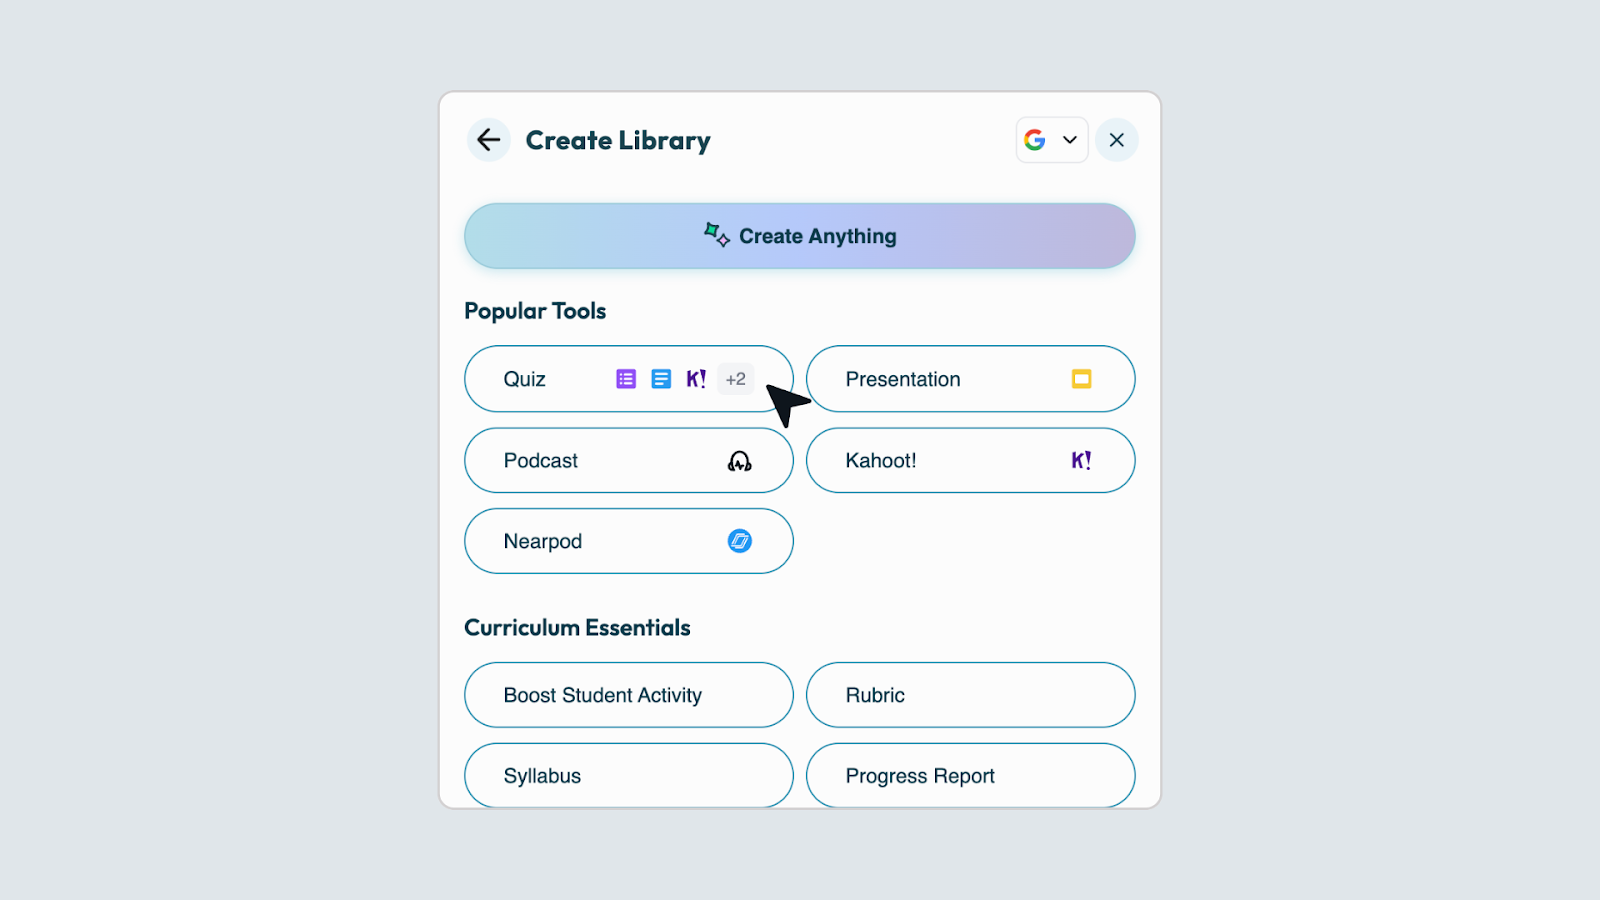
- Select Quiz.
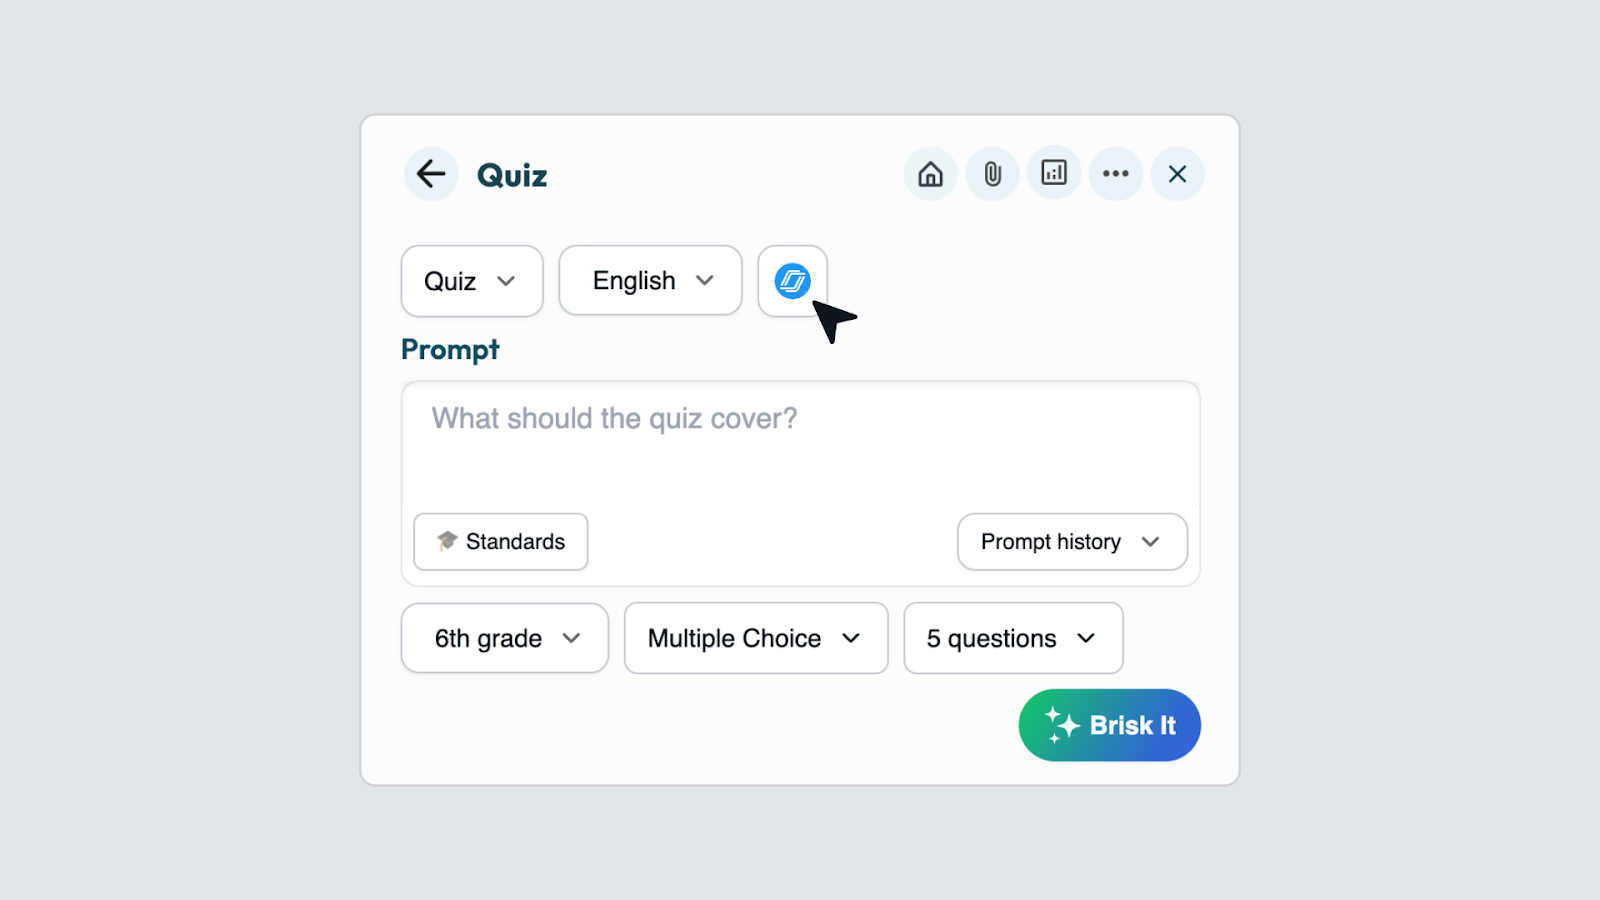
- Choose Nearpod from the options dropdown.
- Generate your quiz — it appears in your Nearpod account automatically.
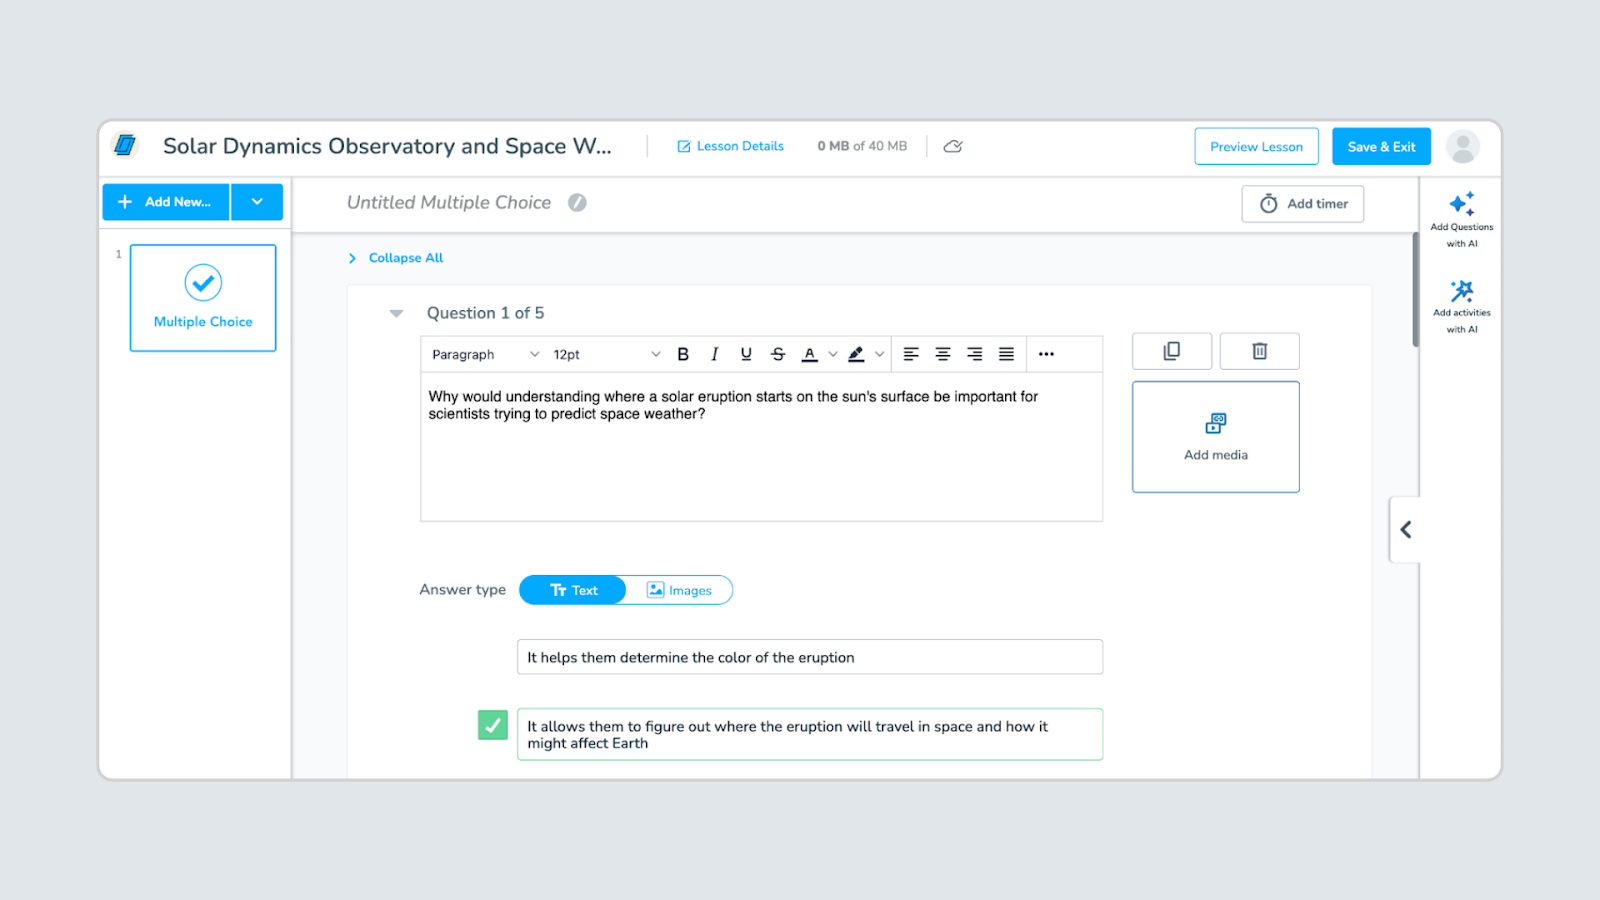
Requirements: You must be logged into Nearpod for this feature to work. If you're not, Brisk will prompt you to connect your account.
Create Library UI Update
April 2, 2026
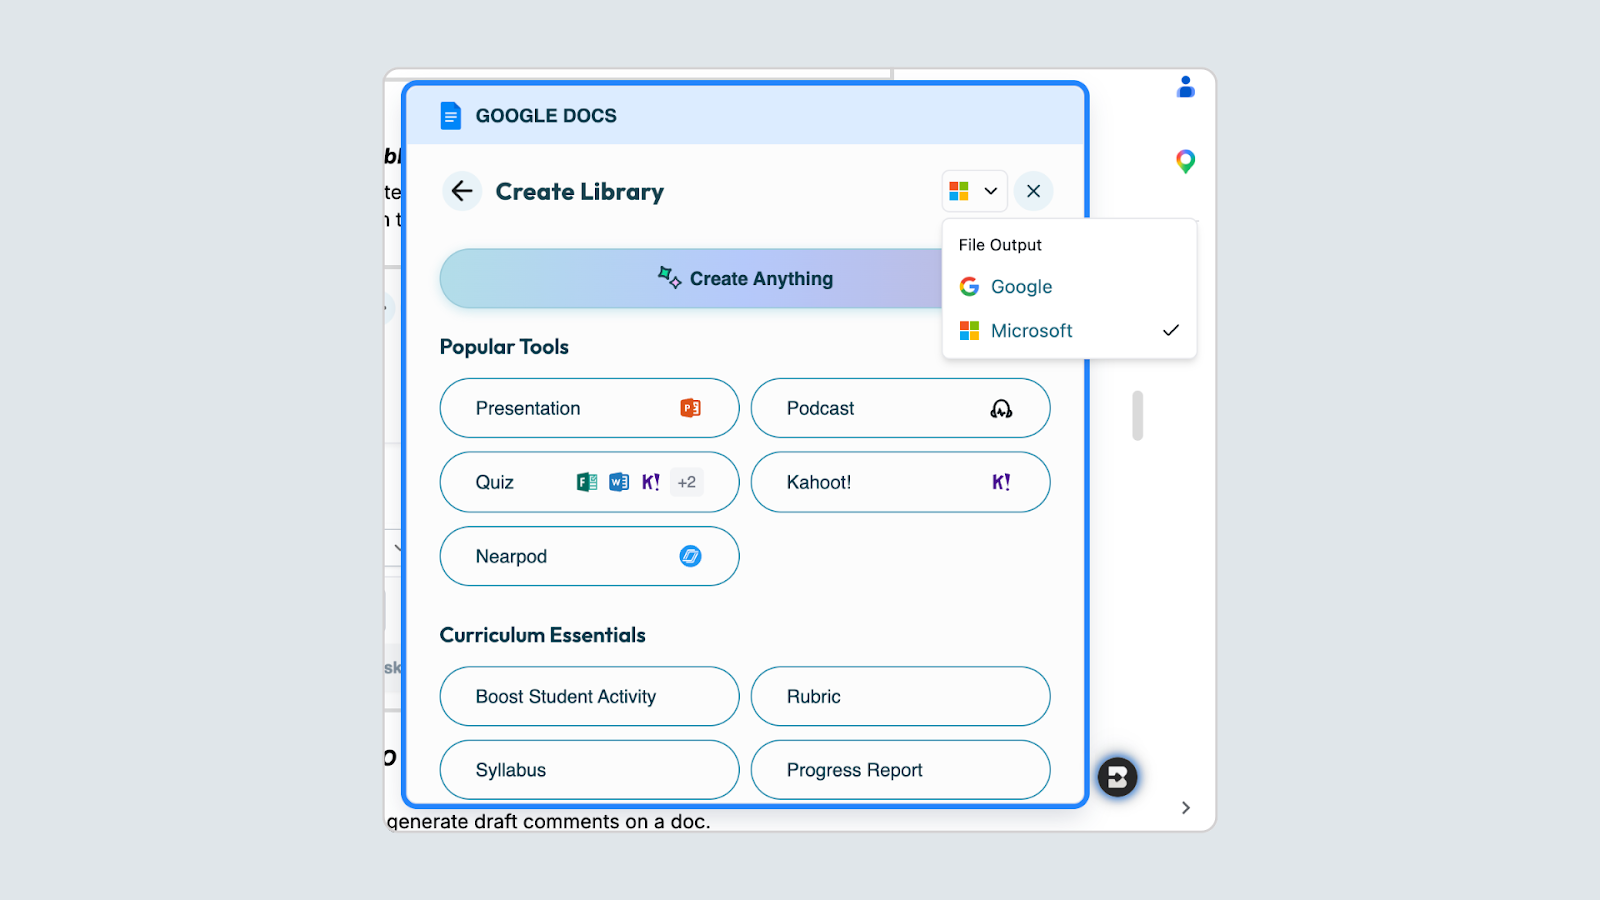
The Create Library now asks you to select your provider — Google or Microsoft — before choosing a tool. Icons and options update automatically based on your selection.
Student Safety Admin Notifications — Real-Time Alerts in Brisk Boost
March 31, 2026
Org admins can now opt in to receive email notifications when student messages are flagged in Brisk Boost activities.
When a flag is detected, admins receive a direct link to review the full conversation in context — including the activity name, teacher name, and learning objectives. No student PII is included in the notification email.
Admins choose which alerts to receive:
- Escalated — self-harm, violence, harassment, hate speech
- Inappropriate — profanity, sexual content, off-topic interactions
Configure notification preferences from Student Safety in the Site Dashboard. Settings are per admin, per org. Notifications are off by default.
Available for School & District plan users.
Microsoft Forms — Now a Quiz Output in Brisk
March 31, 2026
Microsoft Forms is now available as a quiz output type in Brisk.
Teachers in Microsoft environments can generate a quiz in Brisk and send it directly to Forms — no reformatting, no copy-paste. Just select Microsoft Forms from the output dropdown, generate, and go.
Available for all Brisk users.
Export Quizzes Directly to Canvas
March 13, 2026
Brisk now exports quizzes as Canvas QTI files — a standard format Canvas can import directly into your course.
To generate a Canvas QTI quiz, open the Brisk Chrome Extension, go to Create → Quiz, and switch the output format to Canvas QTI using the document type icon next to the language dropdown. Fill in your quiz details, generate, review your questions, and click Download for Canvas.
Before you download, keep these in mind:
- Keep all questions in multiple choice format.
- Each correct answer must have an asterisk (*) at the very start of the line — no space between the asterisk and the answer text. Canvas uses these to identify correct answers.
- Do not unzip the downloaded file. Canvas requires it to stay as a .zip.
To import, go to your Canvas course Settings → Import Course Content, select QTI .zip file as the content type, upload your file, and click Import. If you see a "New Quizzes" checkbox during import, leave it unchecked unless your school specifically uses New Quizzes.
For full instructions and troubleshooting tips, see How do I create a QTI quiz?
What's New in Brisk Boost Student Extension
March 9, 2026
We've been listening — and building. This update brings meaningful improvements to Brisk Boost and your content organization tools, making Brisk more powerful for teachers and more seamless for students.
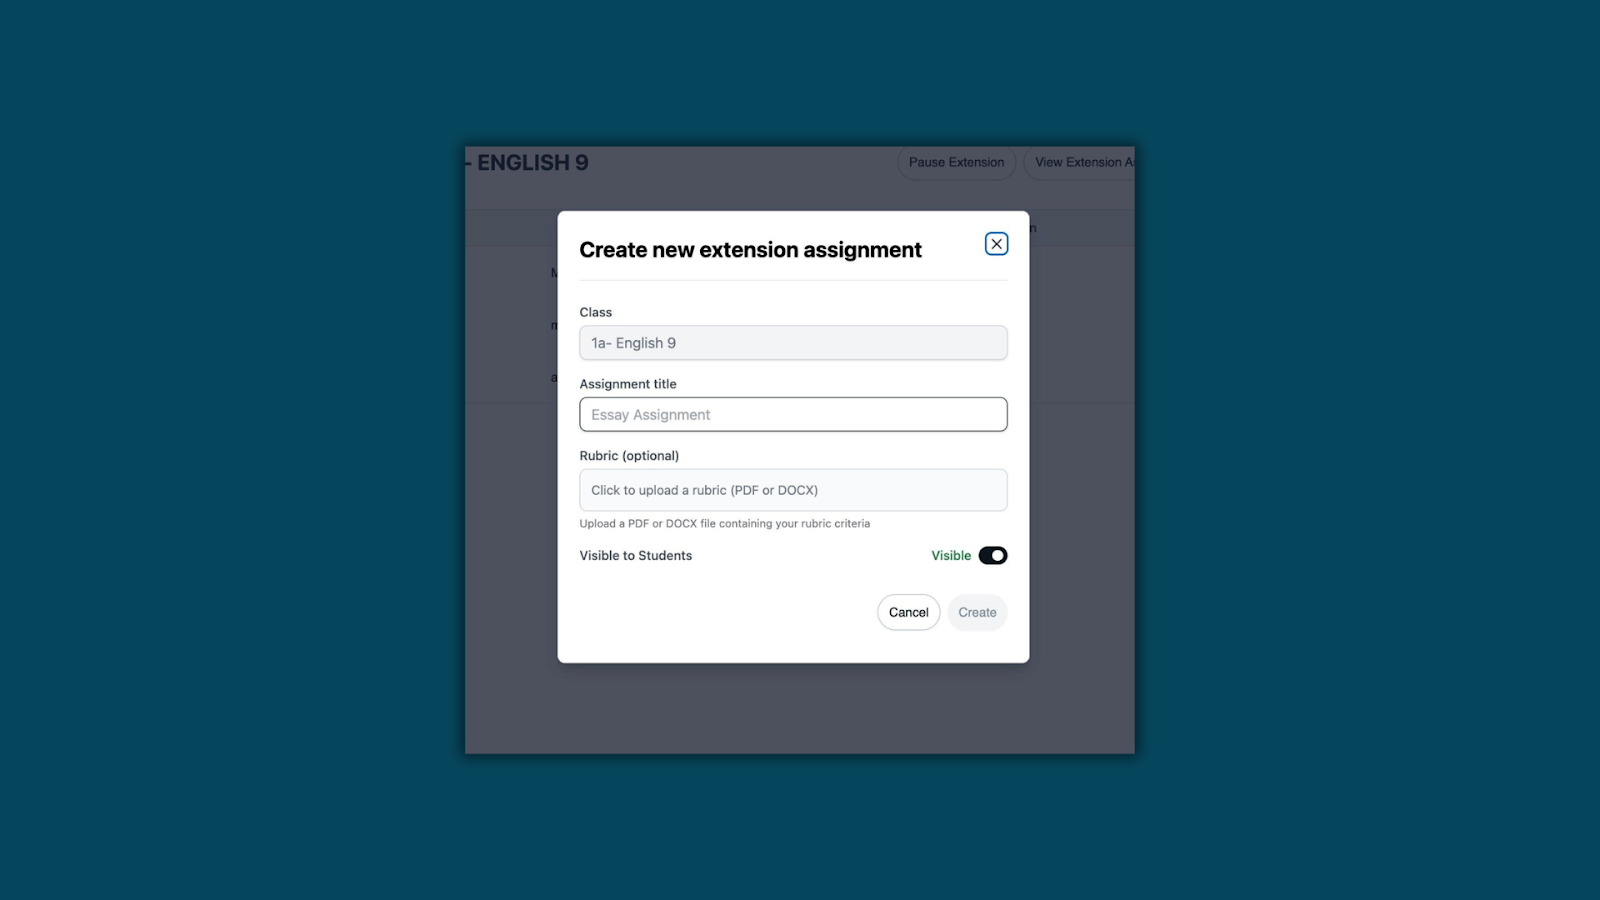
Assignments in Brisk Boost: Teachers can now create Assignments in Brisk on the web for their classes. Once set up, assignments are instantly accessible to students in the Brisk Chrome Extension. Each assignment has its own title, optional rubric (PDF or DOCX), and visibility settings — so teachers are no longer limited to a single rubric per class.
How Assignments work:
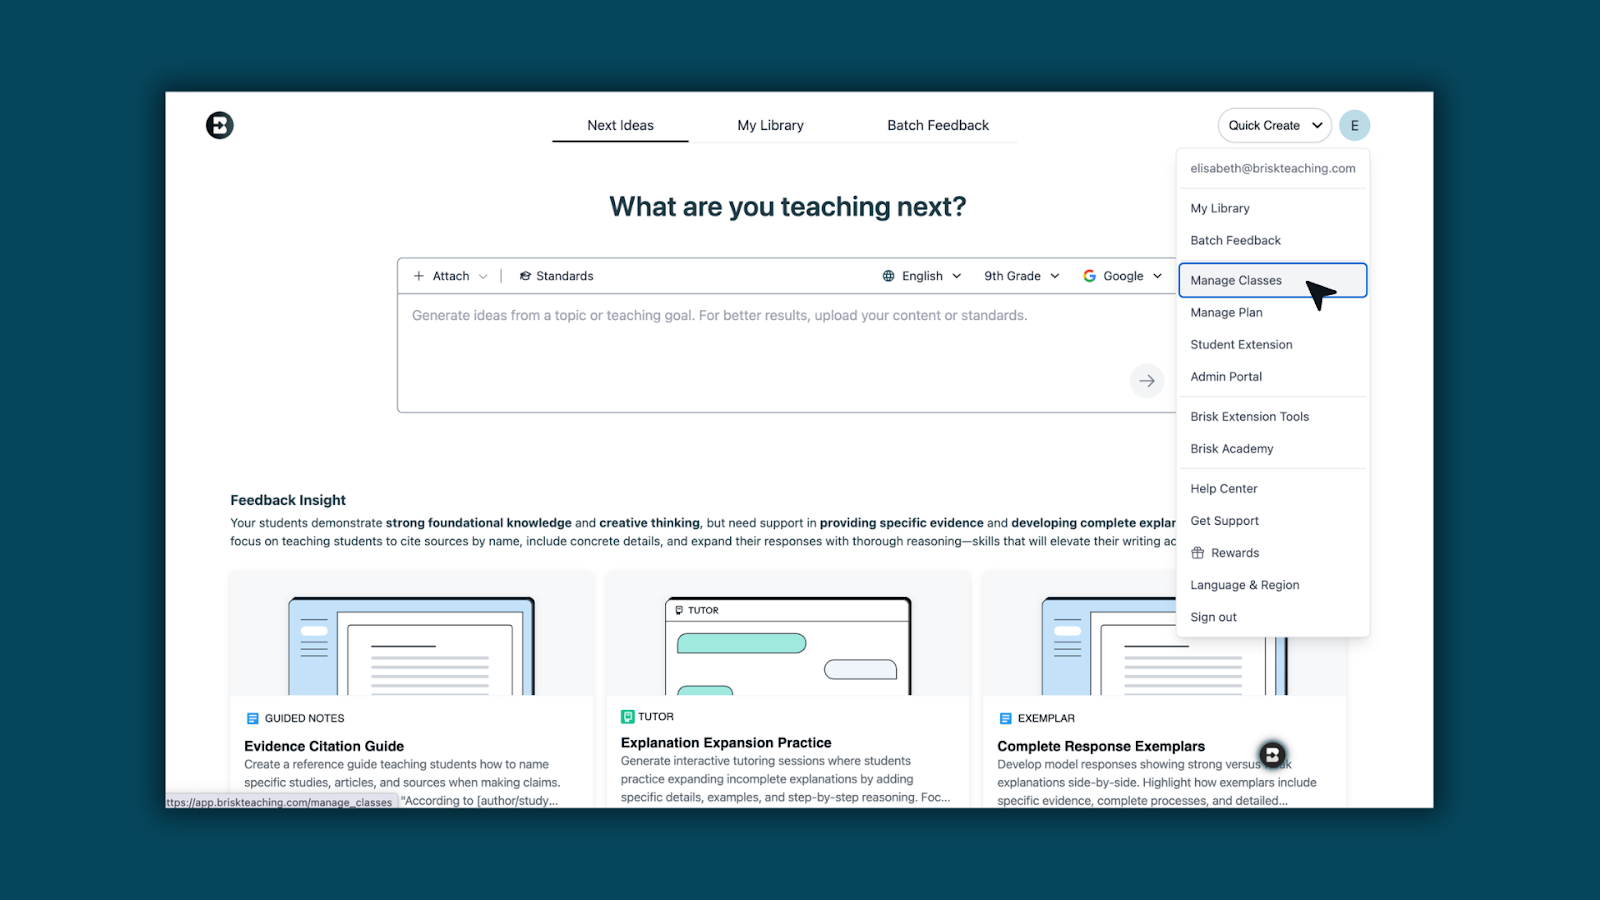
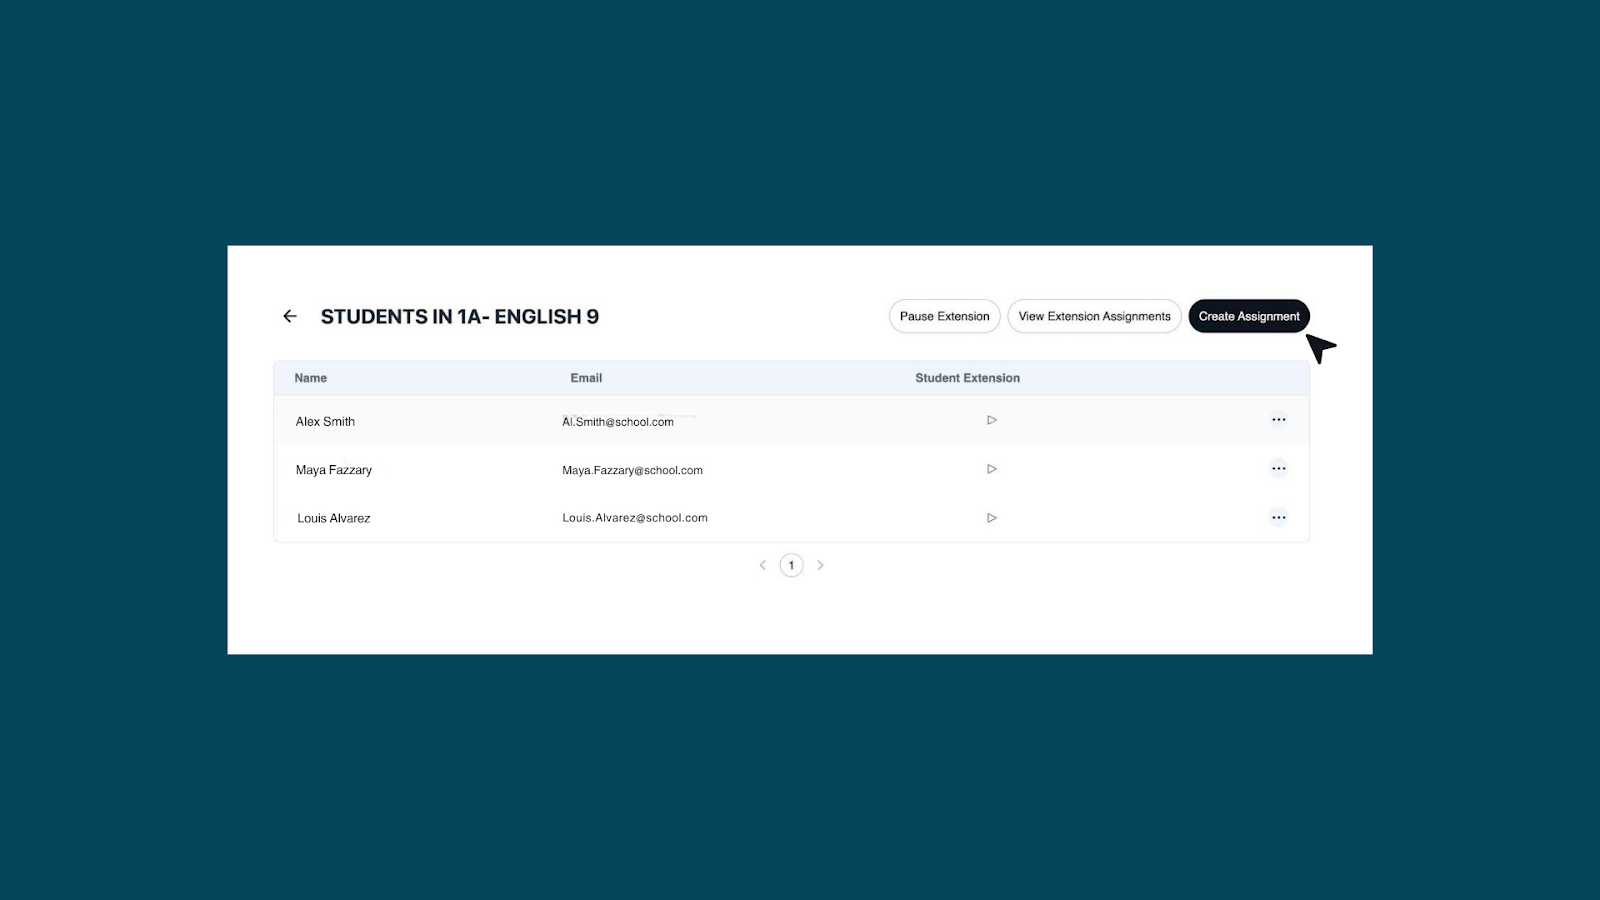
Step 1: Create an Assignment. In Brisk on the web, navigate to your class and open the student roster. Click Create Assignment, give it a title, set visibility, and optionally upload a rubric.
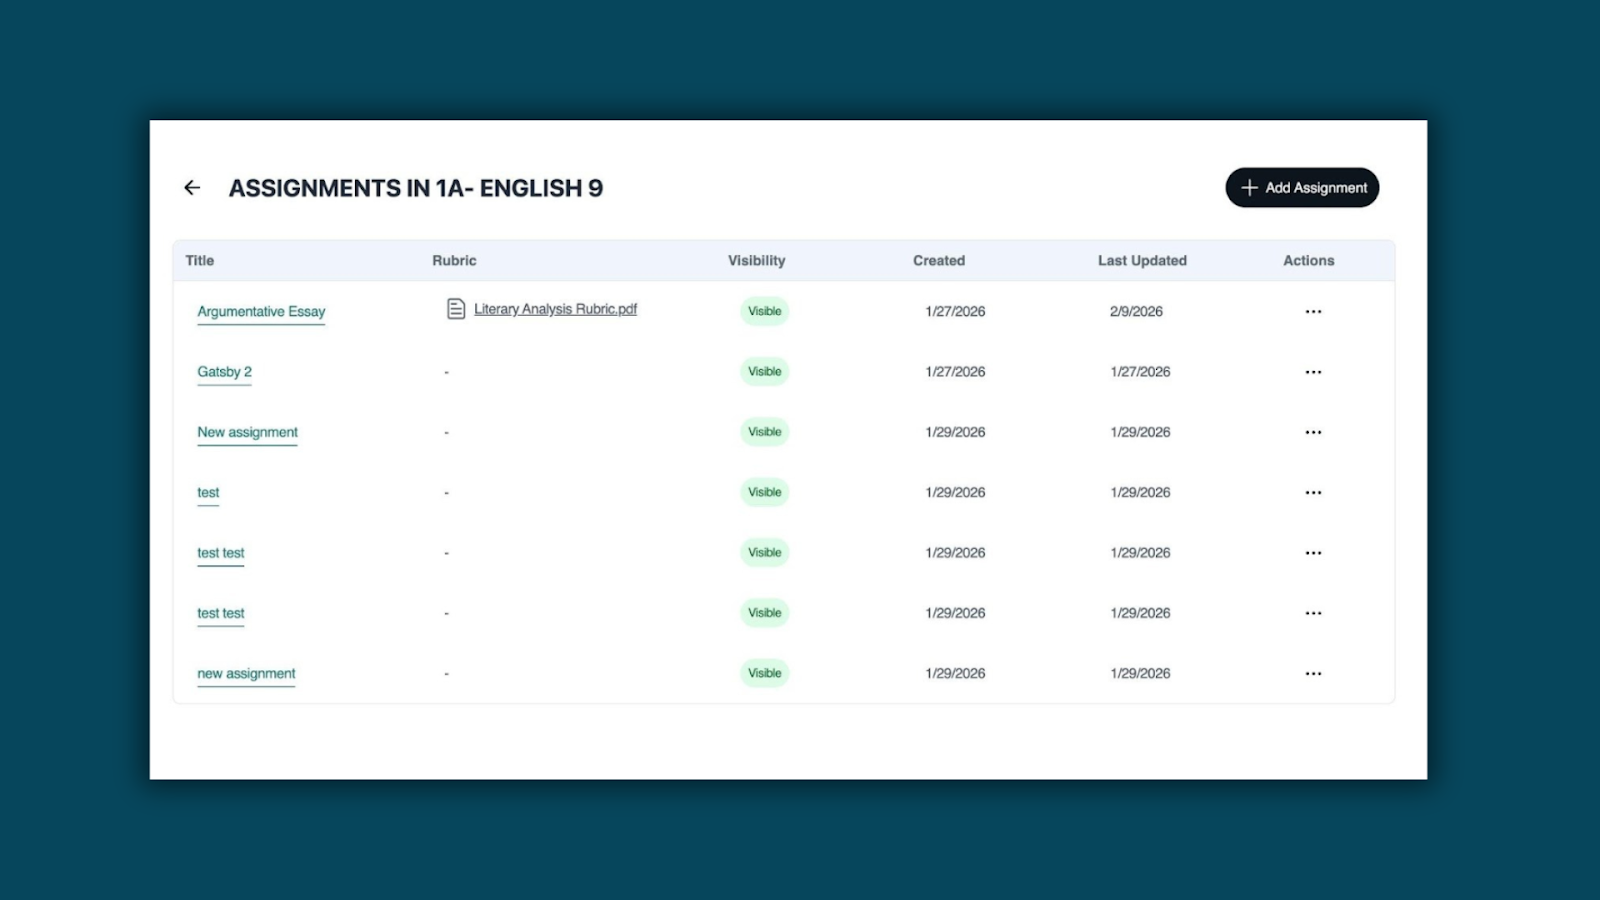
Step 2: Manage your Assignments. All assignments for a class live in one place. See which rubric is attached, whether an assignment is visible to students, and when it was last updated — with the option to add more at any time.
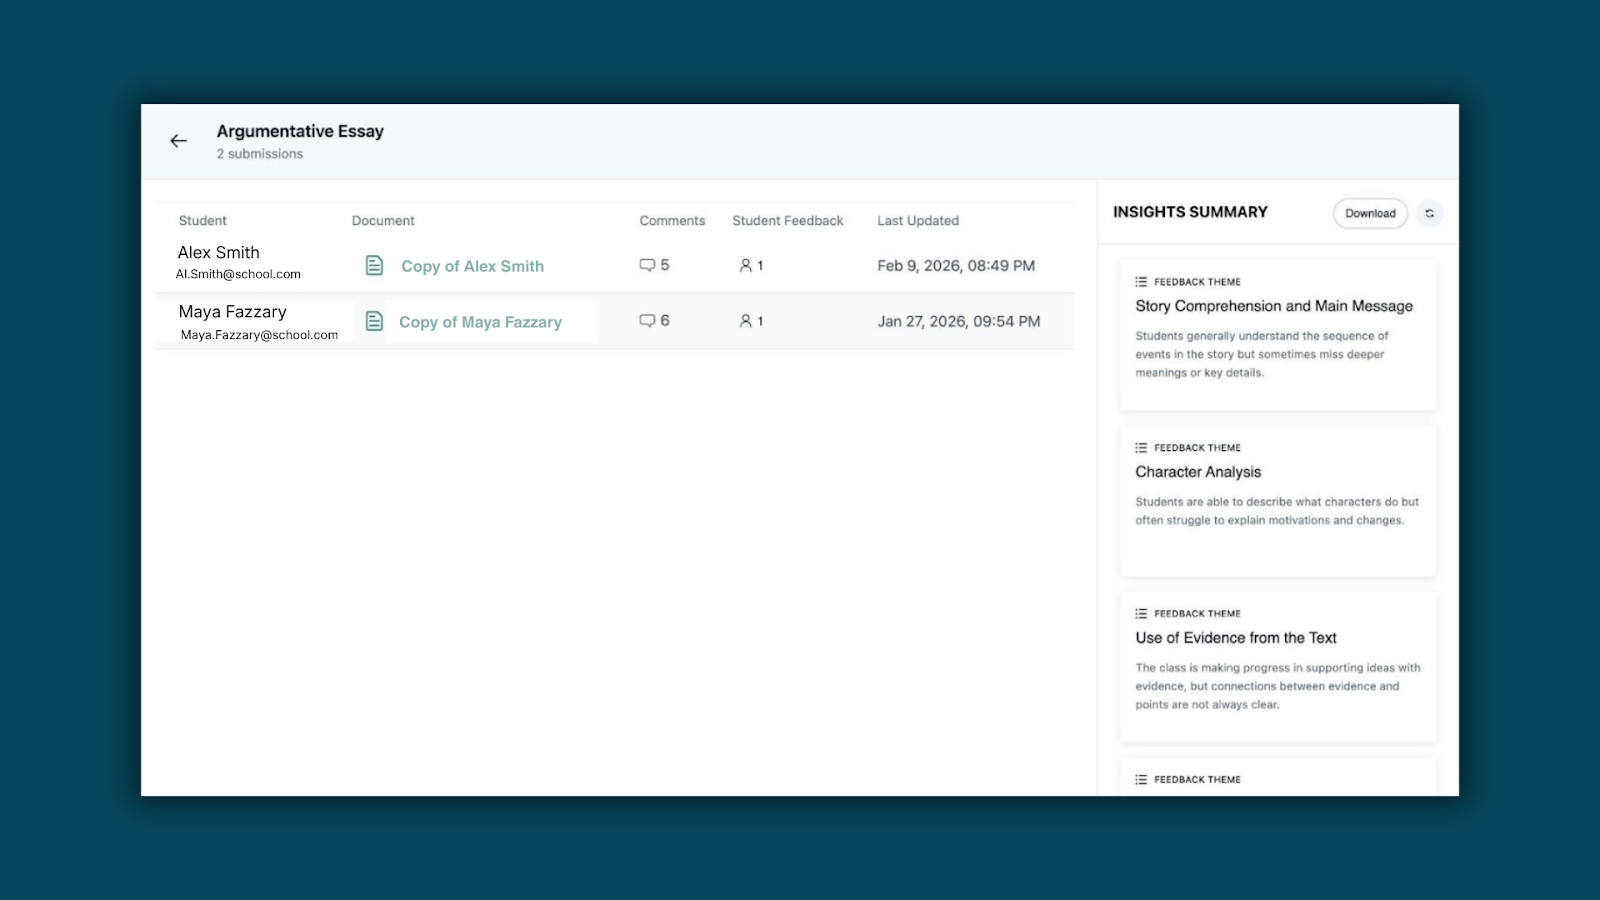
Step 3: Review submissions and class-wide insights. Teachers get an assignment-level view of all submissions, with an AI-generated Insights Summary that surfaces common themes and struggles across the class — without having to open every student's document.
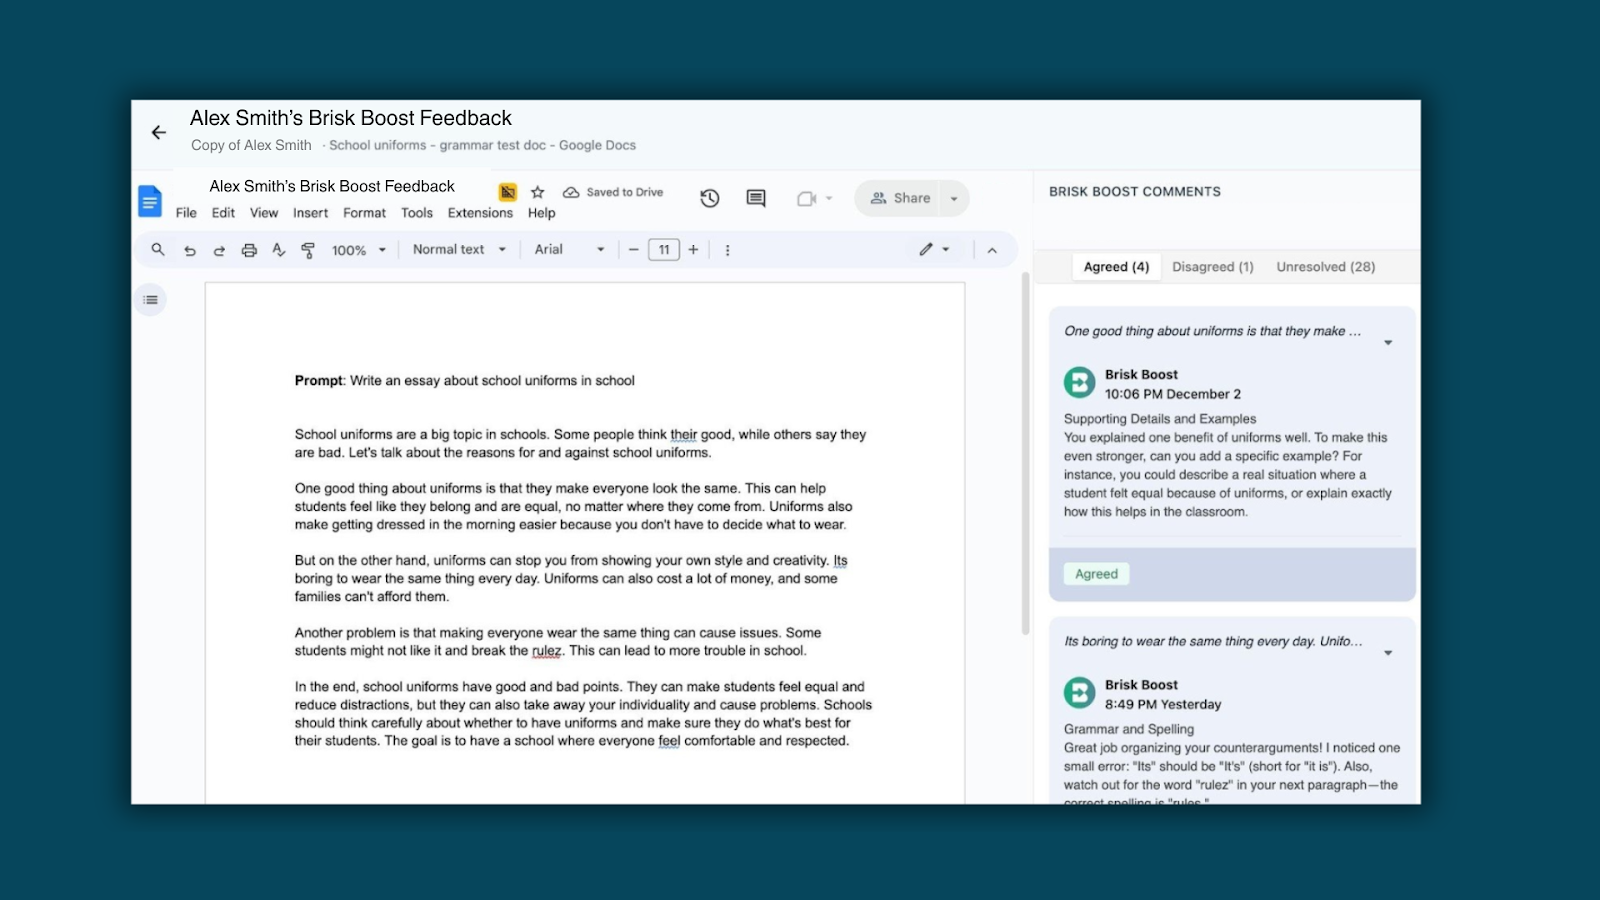
Step 4: See feedback in action. Clicking into a student's submission opens their Google Doc with the Brisk Boost feedback sidebar. Inline comments are organized by feedback category, and students can mark each one as Agreed, Disagreed, or Unresolved — making engagement with feedback visible at a glance.
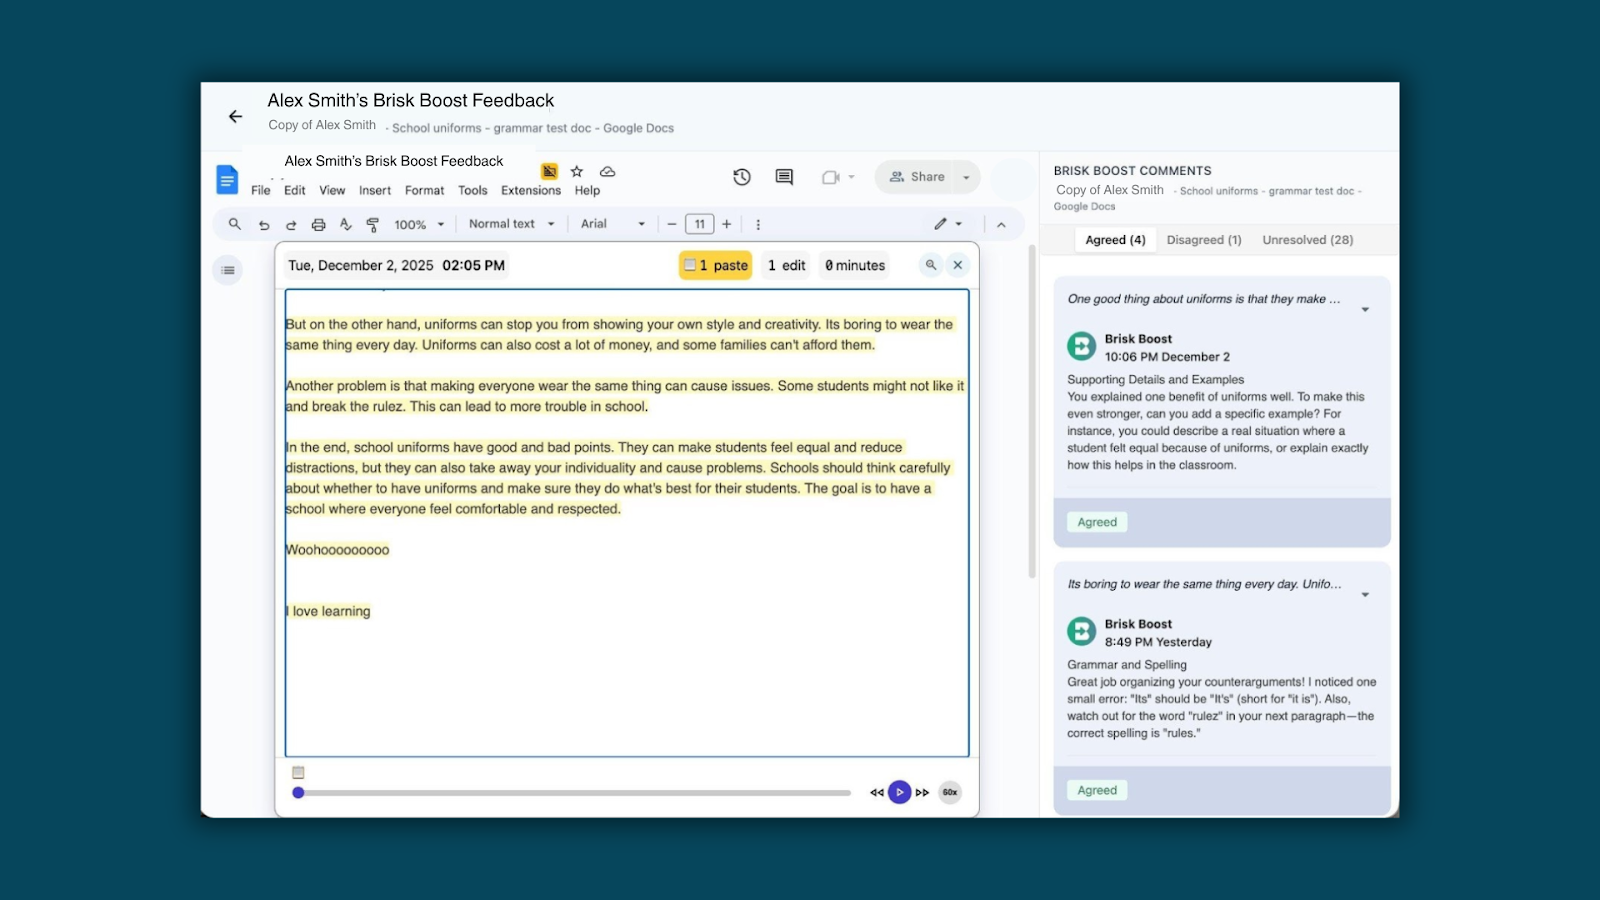
Step 5: Verify the writing process. Teachers can access a version-history replay of any student's document — tracking edits, paste events, and active composition time. Step through changes at up to 60x speed to better understand student writing processes and verify academic integrity.
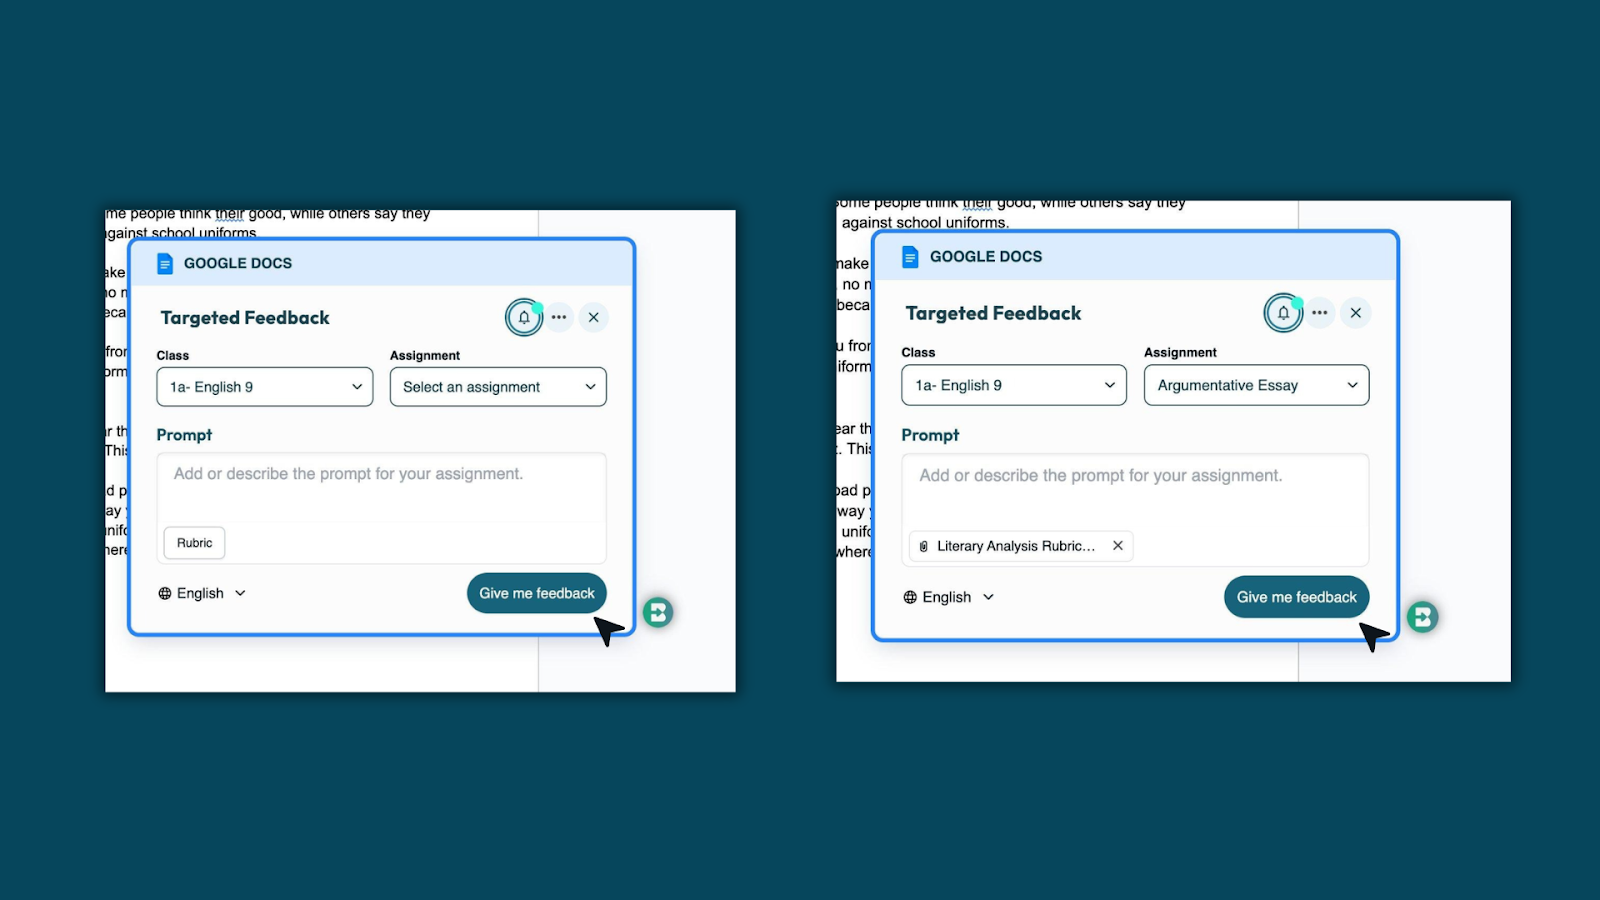
Step 6: Students request Targeted Feedback. When students open the Brisk Chrome Extension, they select their class and assignment. If a rubric is attached, it loads automatically — no extra steps needed. Students click "Give me feedback" and receive AI-generated comments grounded in the exact criteria being used for grading.
Bundles in Brisk — Now Easier to Manage
March 5, 2026
Organizing your content just got more flexible. You can now:
- Create an empty bundle directly from Quick Create
- Reorder items within a bundle
- Rename a bundle
- Move an item to a different bundle
- Remove items from a bundle
Your content, organized exactly the way you want it.
Learn more: How to Create and Share Bundles in Brisk
Kahoot! Quiz Generation — Turn Brisk Quizzes into Interactive Games
February 13, 2026
Kahoot! Quiz Generation lets you take a Brisk-generated quiz and instantly turn it into a live, game-based Kahoot!.
Create once in Brisk, then launch directly into Kahoot to boost engagement and make assessment feel like play.
How Kahoot! Quiz Generation works
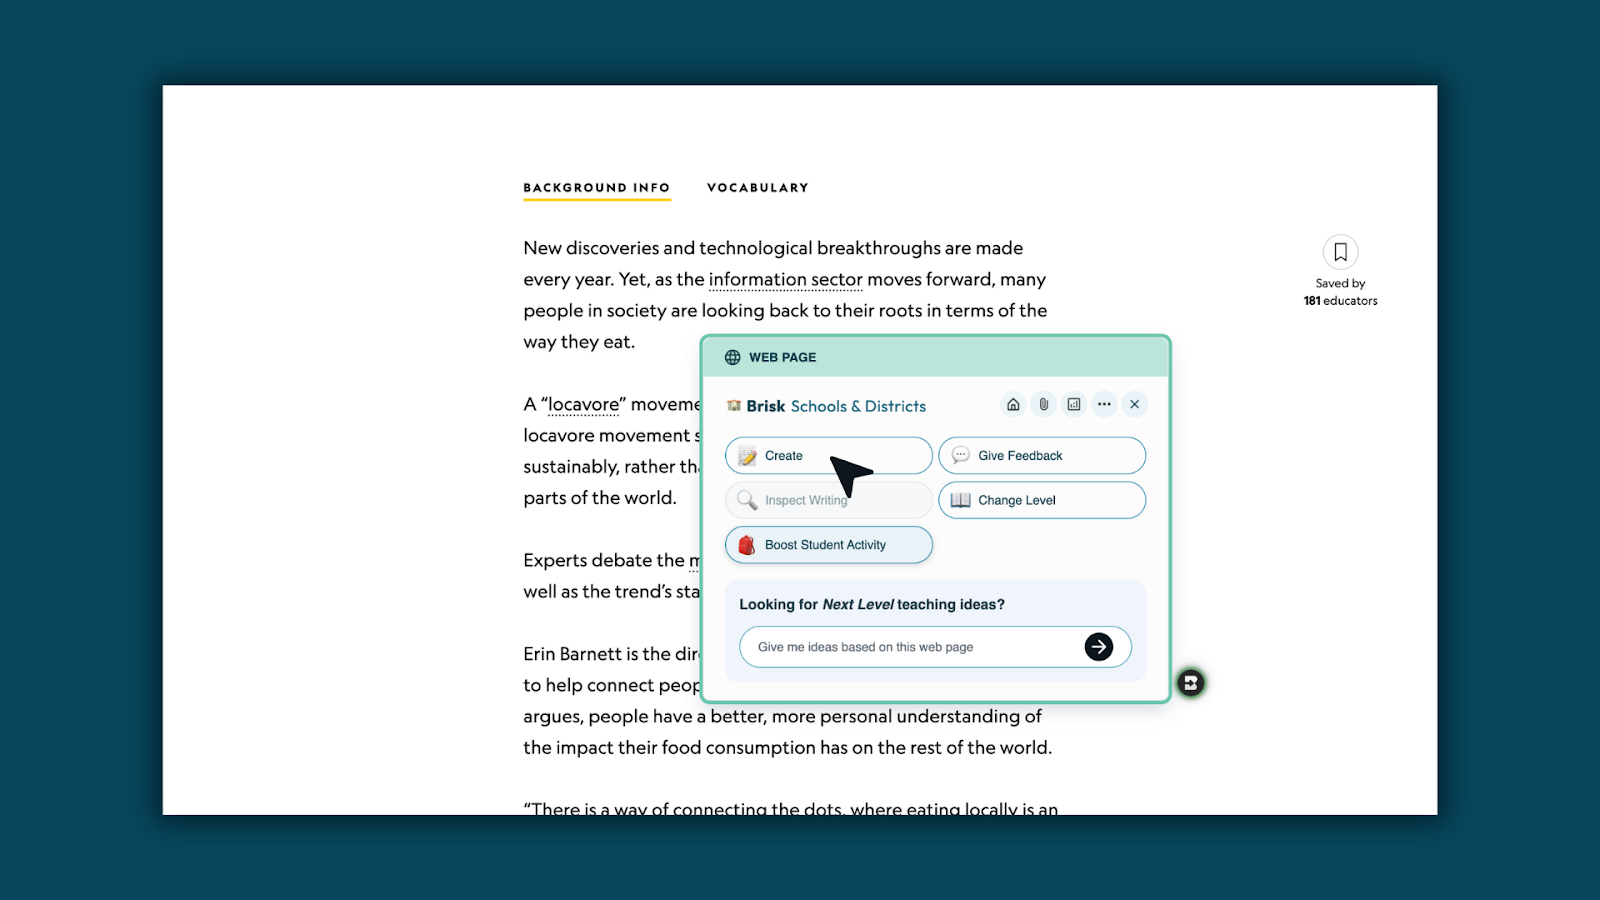
Step 1: Open Create in Brisk
Open the Brisk extension and select Create.
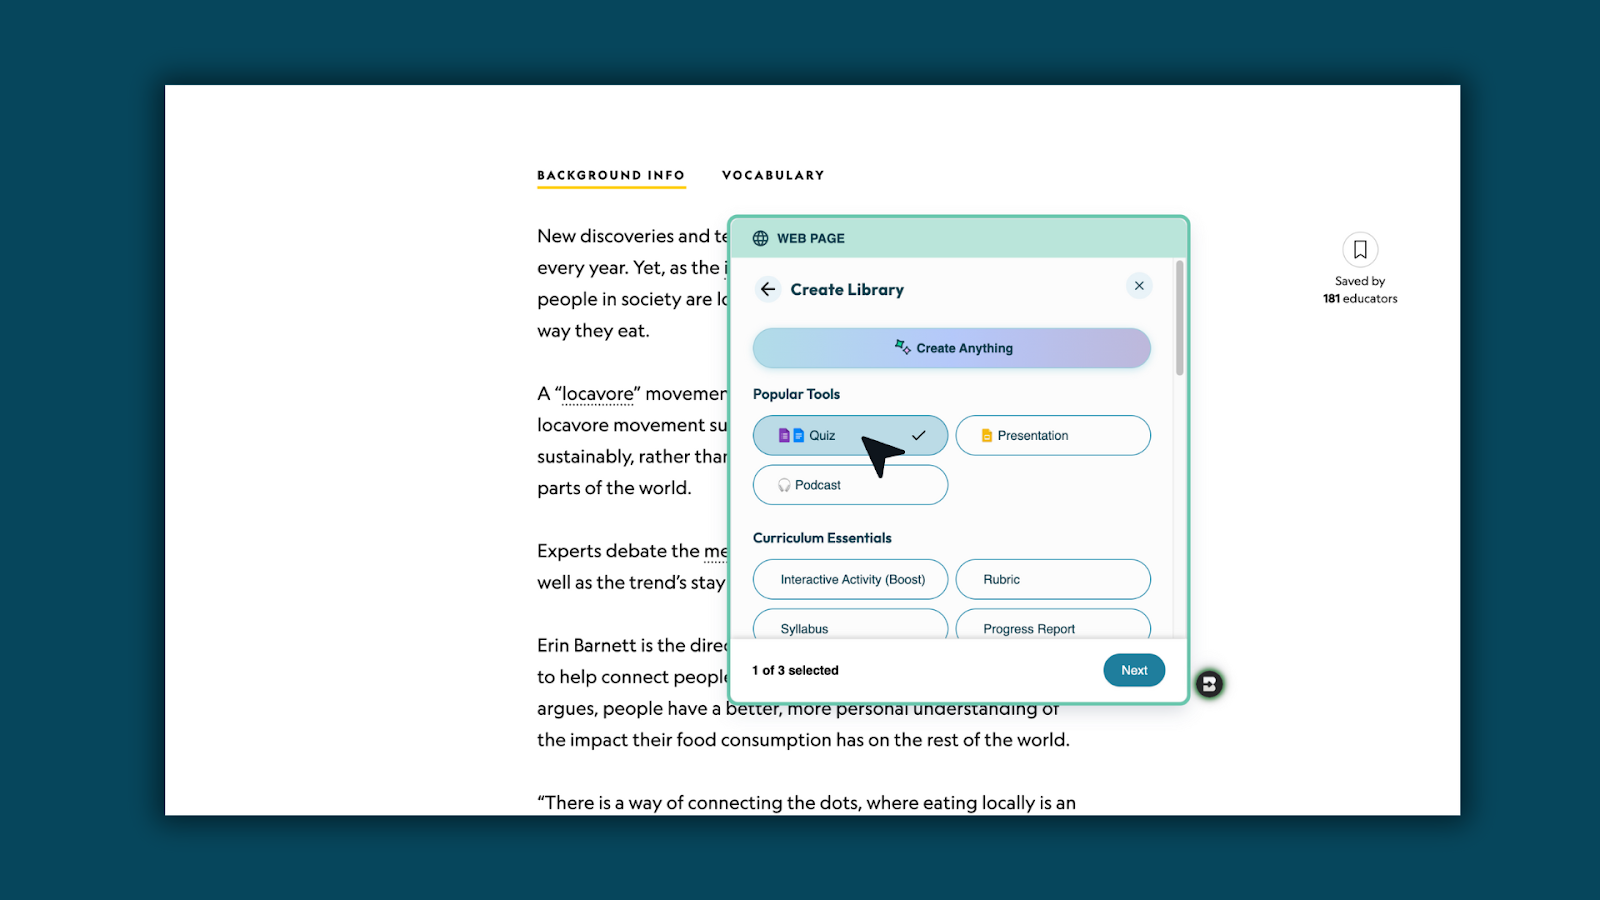
Step 2: Choose Quiz
Select Quiz as your content type.
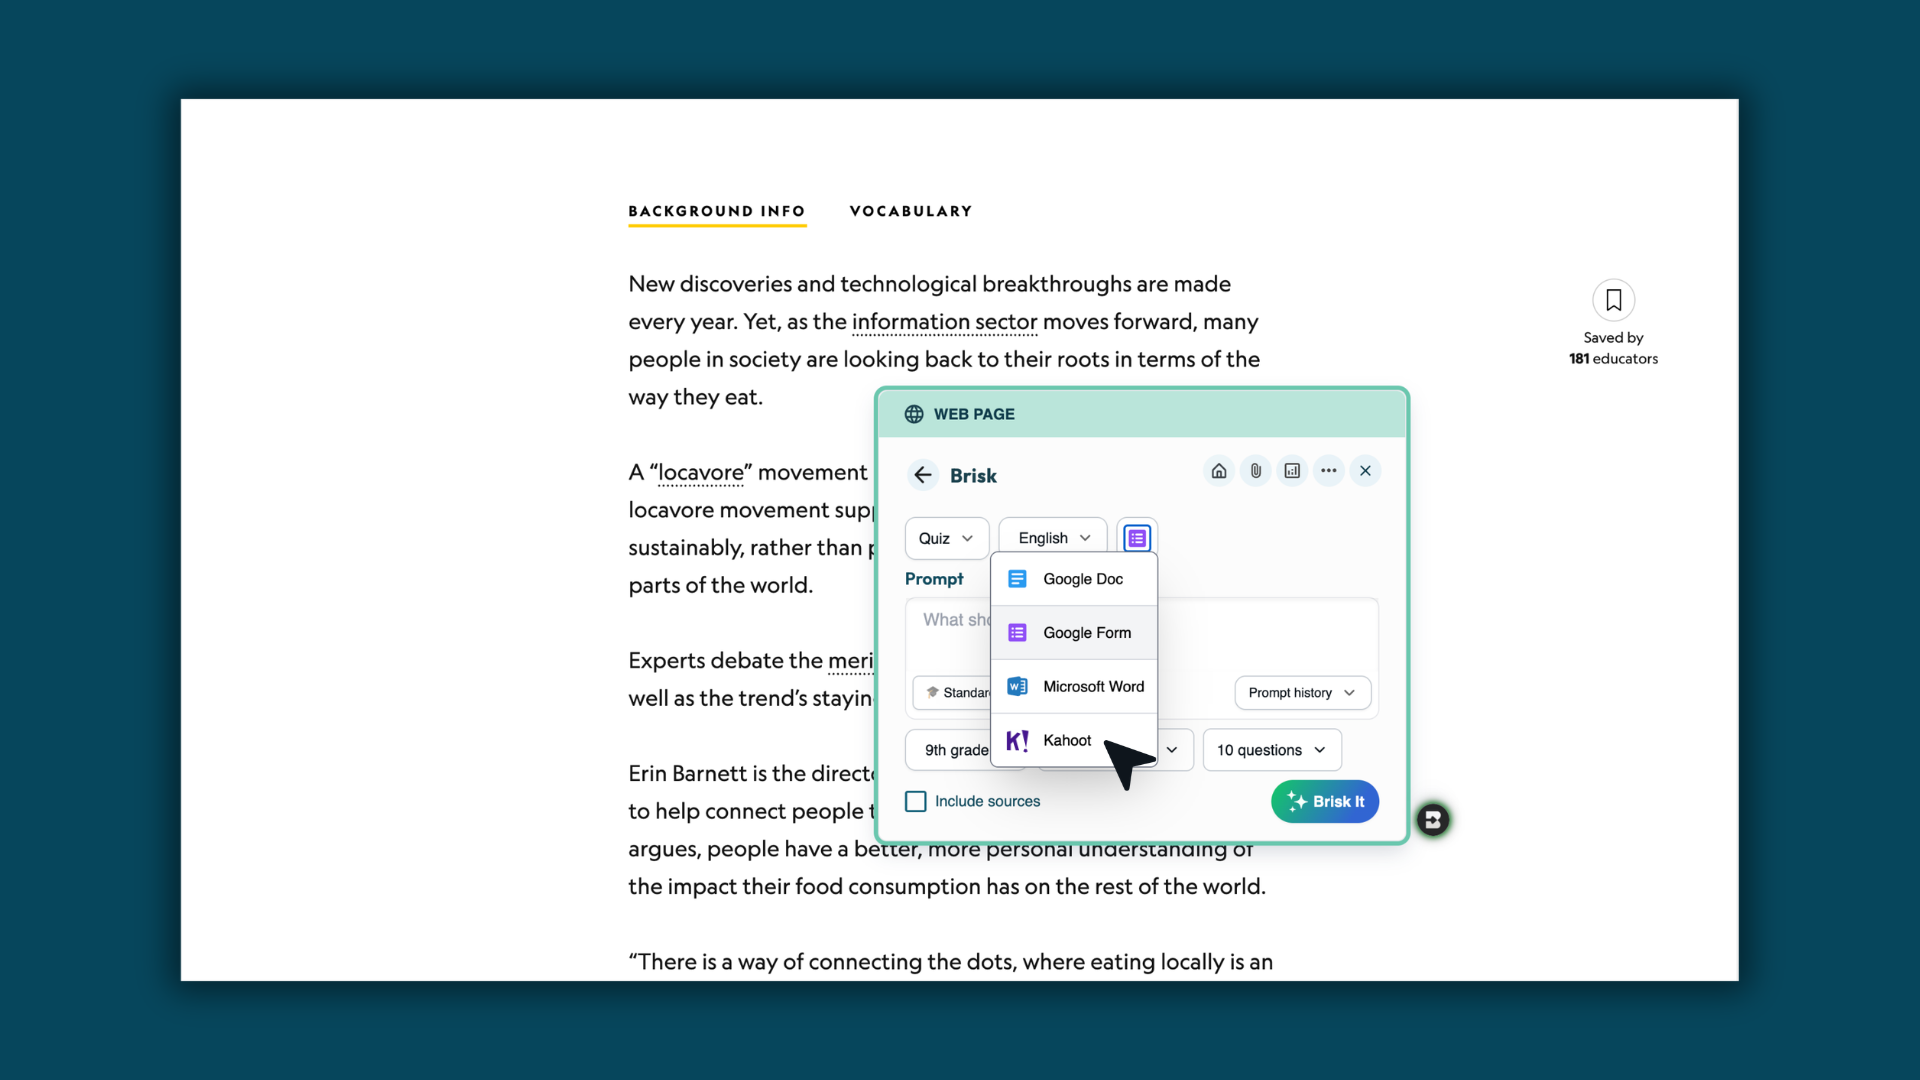
Step 3: Select Kahoot!
From the options dropdown, choose Kahoot! as your output.
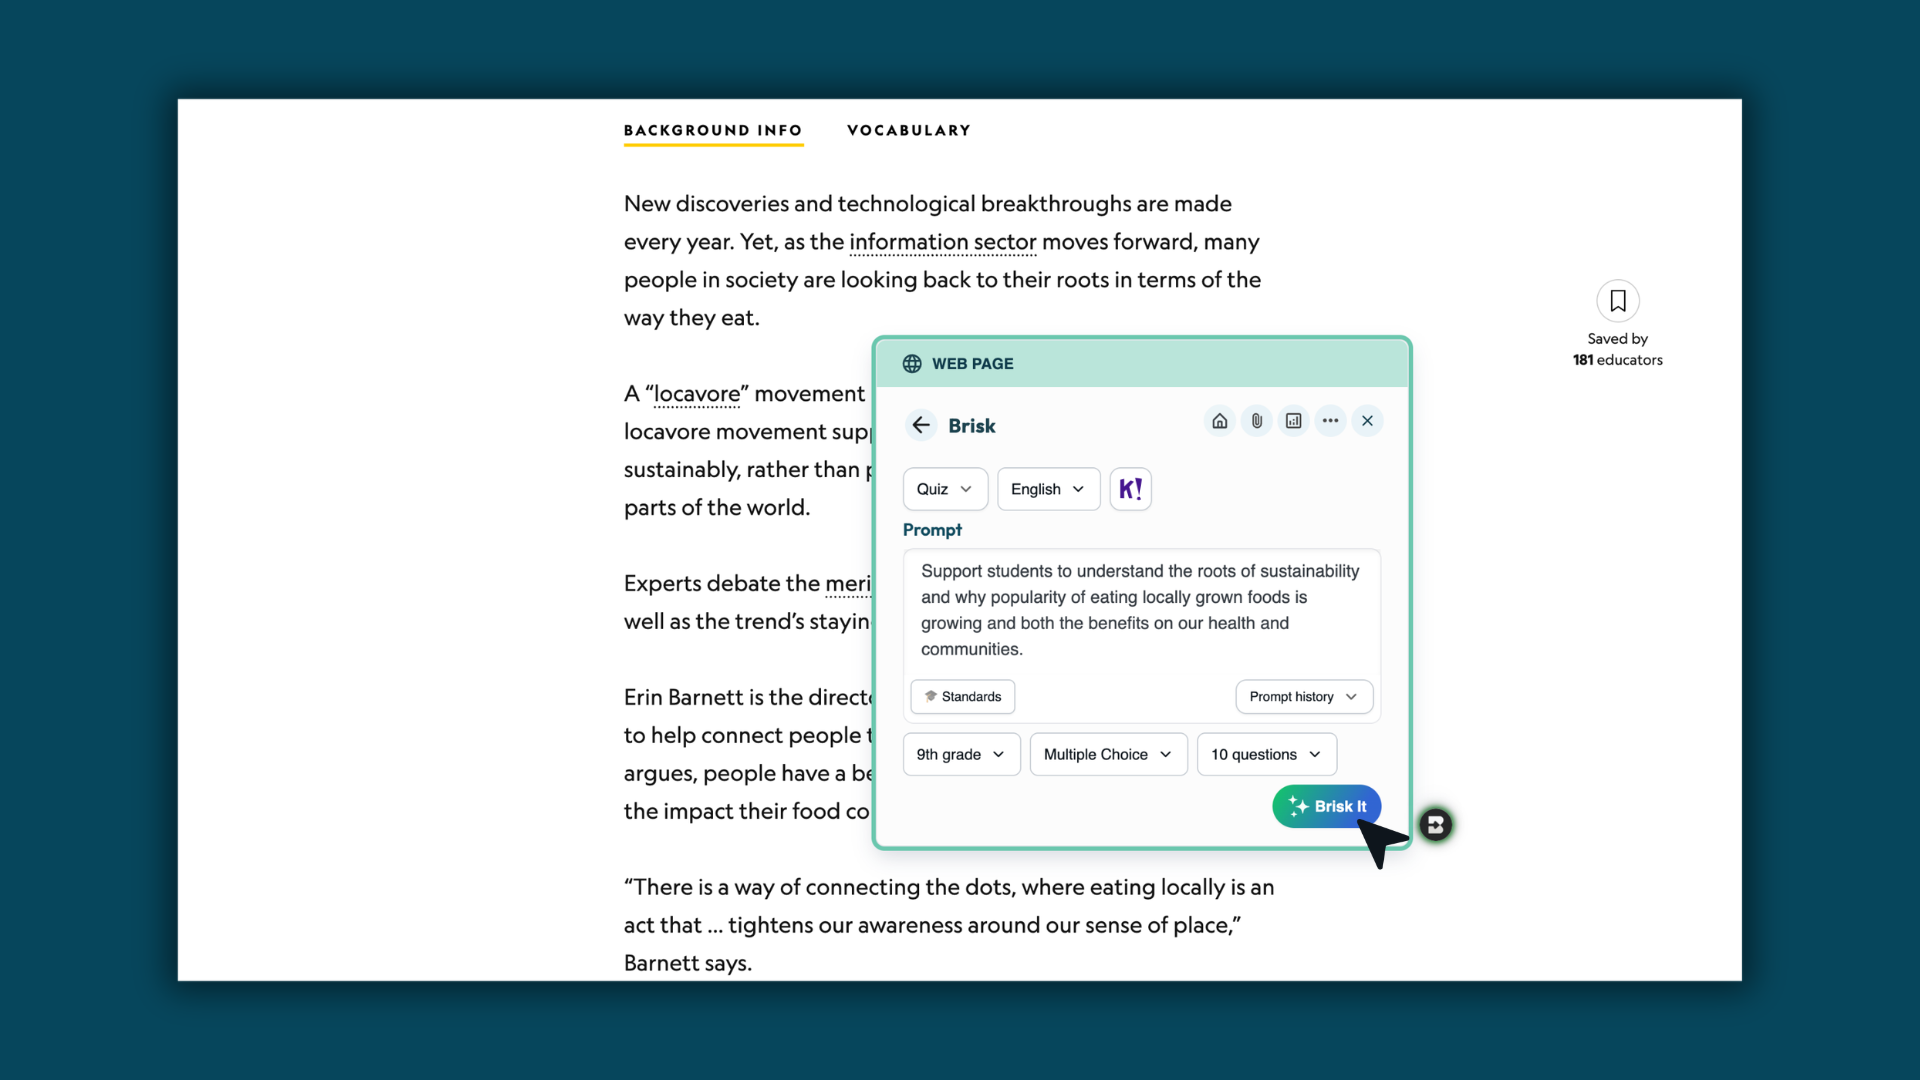
Step 4: Customize your quiz
Adjust grade level, standards, language, and question count. Then, Brisk It!
Step 5: Generate your quiz
Brisk creates your quiz and sends it directly into your Kahoot! account.
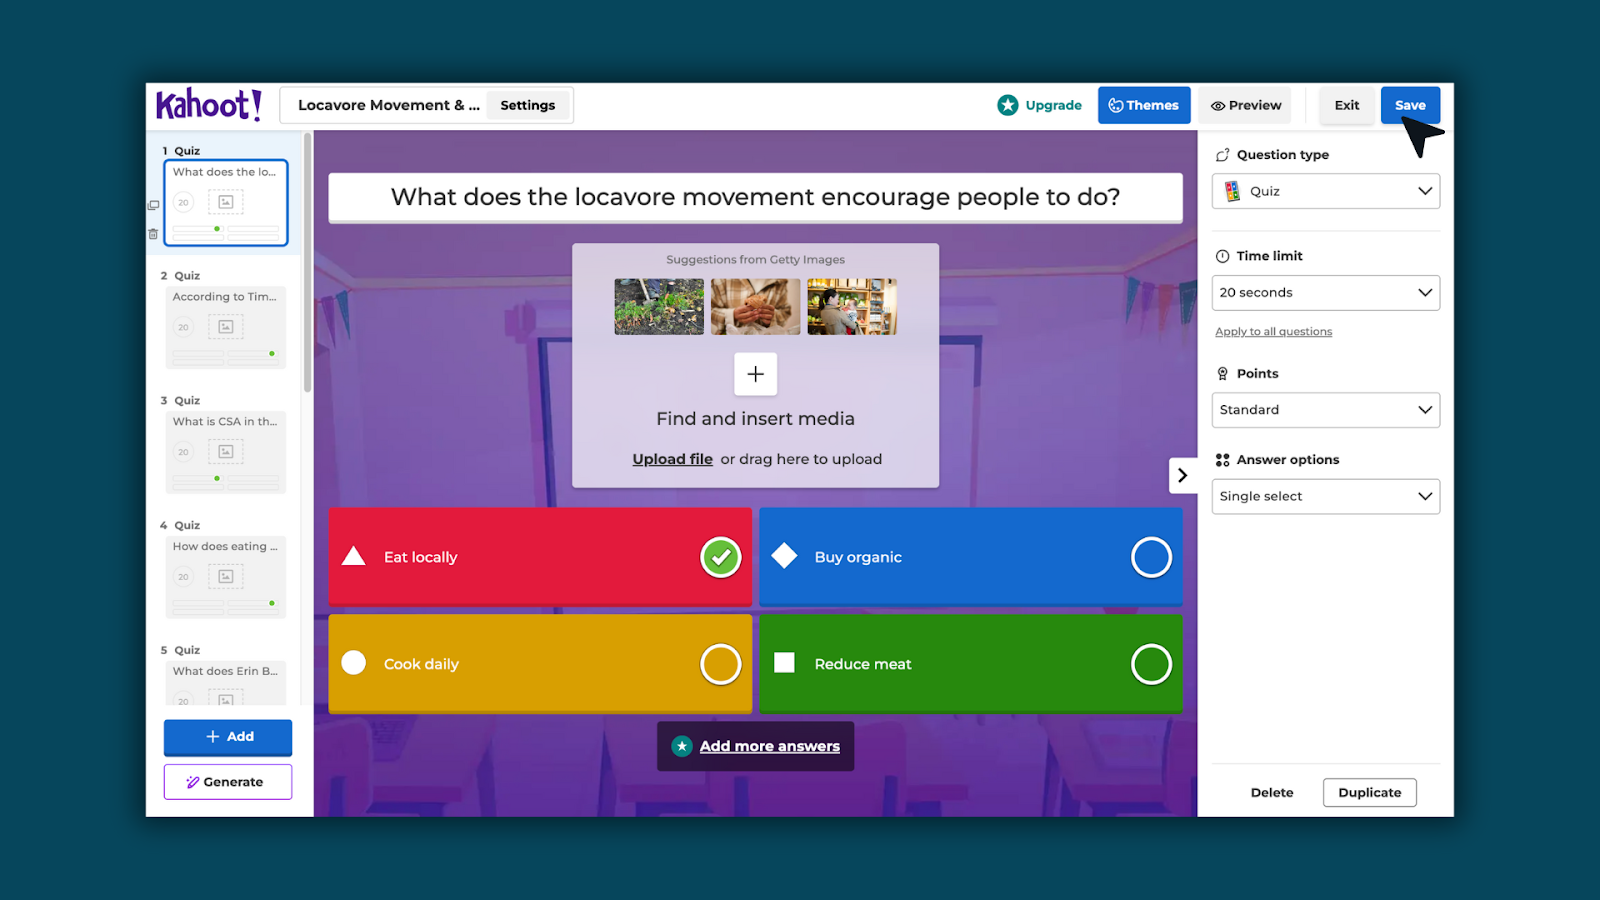
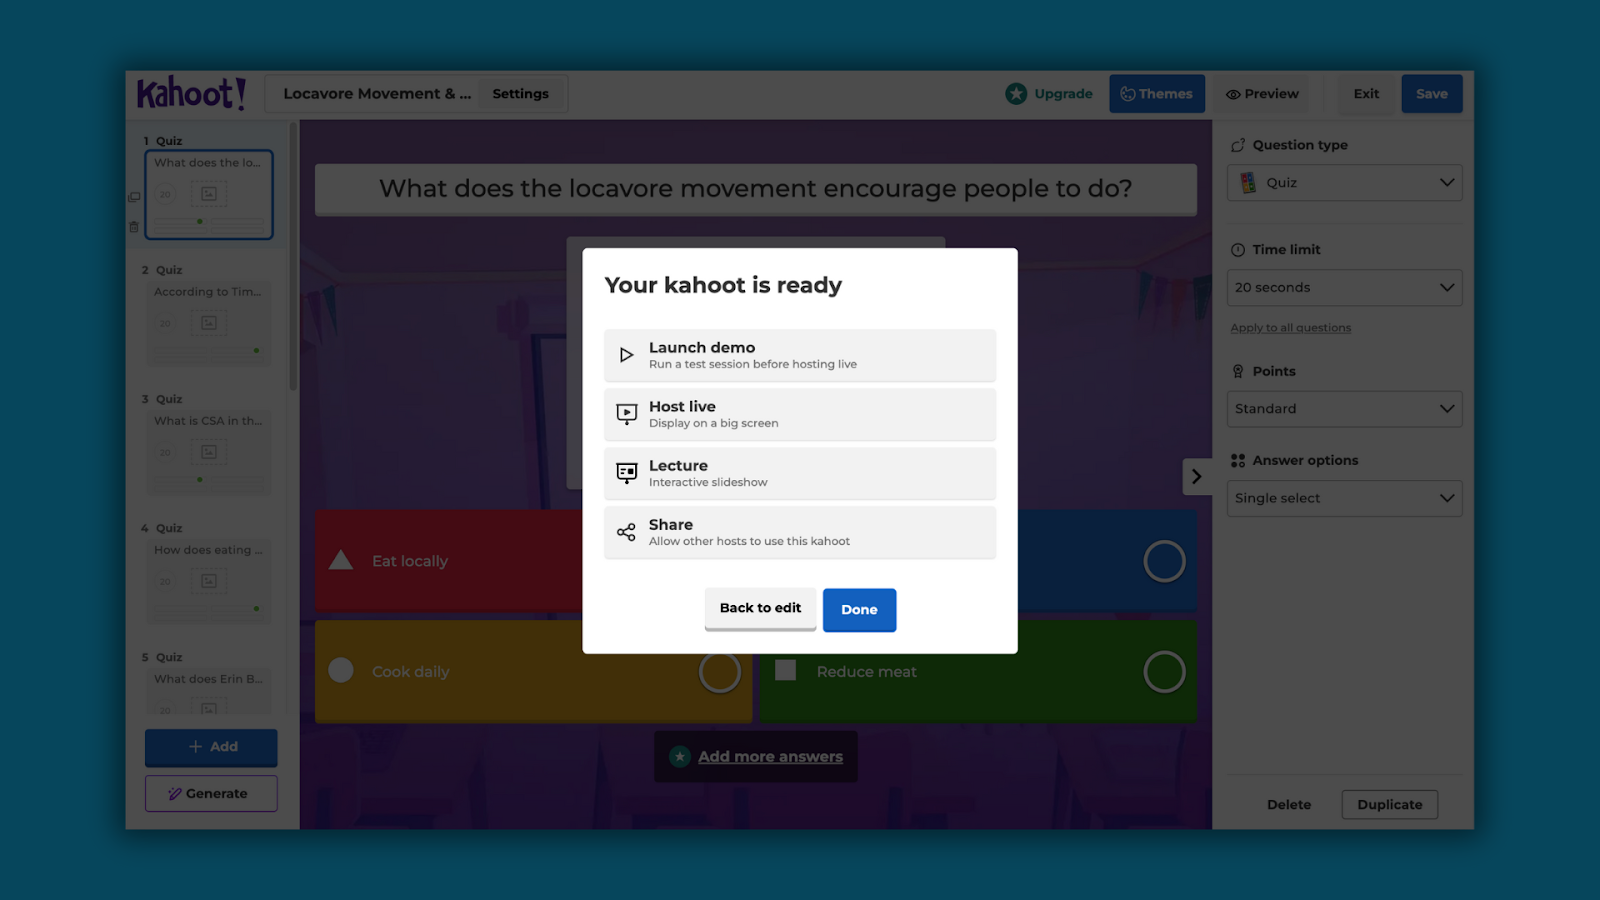
Step 6: Edit and play in Kahoot!
Make any adjustments in Kahoot!, then play with students like any other Kahoot! activity.
What you’ll need
To use Kahoot! Quiz Generation, you must be logged into your Kahoot! account. If you’re not connected, Brisk will prompt you to sign in before creating the quiz.
Important notes
- Kahoot! quiz generation works from the Brisk browser extension (not on Brisk on the web)
- With Kahoot! quizzes, only one grade level and one language can be selected.
- After the generation of content, the quiz can be edited directly in Kahoot!